


How Much Does Roblox Make? Exploring the Roblox Revenue Model
How Much Does Roblox Make? Are you curious about the financial success of Roblox? Wondering how much money the popular gaming platform actually makes? …
Read Article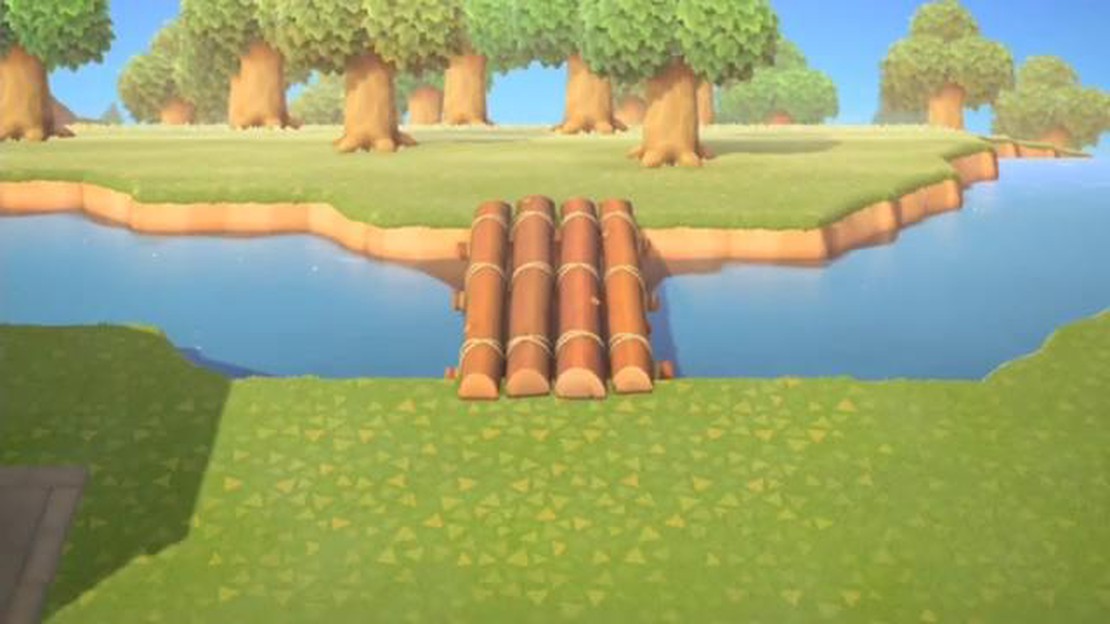
Animal Crossing: New Horizons has captured the hearts of gamers worldwide with its charming gameplay and endless possibilities. One of the key features of this popular Nintendo Switch game is the ability to shape your own island paradise, and building a bridge is a great way to enhance both the aesthetic and functionality of your island.
If you’ve been wondering how to build a bridge in Animal Crossing, you’ve come to the right place. In this step-by-step guide, we will walk you through the process of constructing a bridge that will connect different areas of your island and make it easier for your villagers to get around.
Step 1: Plan the Location
Before you start building your bridge, take some time to plan where you want it to go. Consider the natural landscape of your island and think about how you can incorporate the bridge into the overall design. Look for areas where there are cliffs on both sides of the river or pond, as this will provide a suitable location for the bridge.
Tip: You can use a vaulting pole or the Island Designer app to cross rivers or access areas that you cannot reach at the moment.
Building a bridge in Animal Crossing allows you to connect different areas of your island and make it easier for your villagers to move around. Follow this step-by-step guide to construct a bridge in the game:
Building a bridge in Animal Crossing is a great way to improve the connectivity and accessibility of your island. Follow the steps above to create a bridge and enhance the gameplay experience in your favorite game!
Building a bridge in Animal Crossing requires careful planning to ensure that it’s placed in the right spot. Follow these steps to choose a suitable location:
Once you’ve considered these factors, you’re ready to find the perfect spot for your bridge.
Read Also: Ultimate Guide on How to Build Lancelot in Mobile Legends
Pro tip: Use the terraforming tools in Animal Crossing to alter the terrain and create a more suitable location for your bridge if necessary.
Before you can start building a bridge in Animal Crossing, you will need to gather the necessary materials. Here is a list of the materials you will need:
Wood, iron nuggets, and clay can be obtained by hitting rocks and trees with your axe or shovel. Make sure to gather enough of each material before starting the construction process.
In addition to the materials, you will also need:
Read Also: Exploring the Major Events in the Elder Scrolls Timeline
Once you have gathered all the necessary materials and have access to Nook’s Cranny and a DIY workbench, you are ready to start building your bridge in Animal Crossing!
Once you have decided on the location for your bridge, follow these steps to start building it:
Remember that bridges take up space, so make sure you have a clear area to place it. You can always move items and trees around to create the ideal spot for your bridge.
Now that you have started building your bridge, continue following the construction process to complete it and enhance the overall beauty and functionality of your island!
You can find log stakes in Animal Crossing by chopping trees with a stone or an axe. When a tree is chopped, it will drop wood, which can then be used to craft log stakes.
You can get clay in Animal Crossing by hitting rocks with a shovel or an axe. Sometimes, rocks will drop clay when hit. Keep hitting rocks until you find enough clay to build your bridge.
Yes, you can move a bridge after it has been built in Animal Crossing. To move a bridge, you will need to have reached the “Island Designer” phase of the game and have unlocked the ability to place and move bridges. This can be done by speaking to Tom Nook and choosing the “Redeem Nook Miles” option.
How Much Does Roblox Make? Are you curious about the financial success of Roblox? Wondering how much money the popular gaming platform actually makes? …
Read Article
How to get the R.A.I. K-84 Wonder Weapon in Call of Duty: Cold War The R.A.I. K-84 Wonder Weapon is one of the most powerful and sought-after weapons …
Read Article
How To Refund Call Of Duty Vanguard? If you recently purchased Call of Duty Vanguard and are not satisfied with the game, you may be wondering if it …
Read Article
This Undertale mod adds local co-op, but playing online requires some extra work Undertale, the critically acclaimed indie RPG, continues to capture …
Read Article
How To Go To Your Favorites On Roblox? If you’re a fan of Roblox, you know how important it is to keep track of your favorite games, items, and …
Read Article
Guardians of the Galaxy: should you sell Groot or Rocket? Guardians of the Galaxy is a popular RPG game developed by Marvel’s Guardians Of The Galaxy. …
Read Article


