


Great Sword of Favonius Genshin Impact: Unleash Its Power in Teyvat!
Great Sword of Favonius Genshin Impact Are you ready to take on the challenges of Teyvat? Upgrade your arsenal with the Great Sword of Favonius in …
Read Article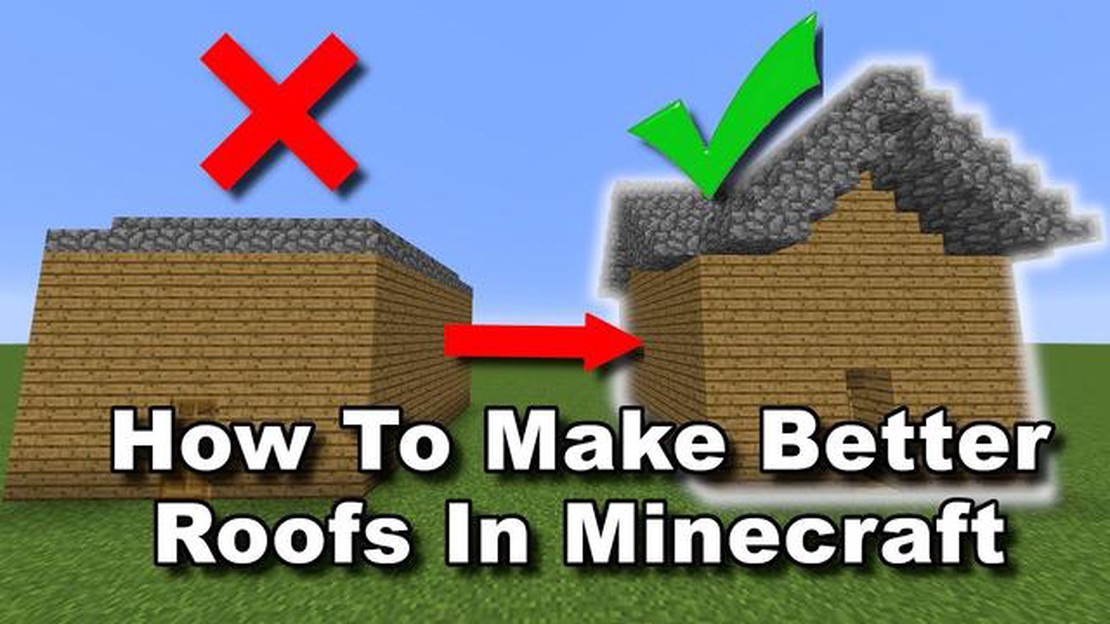
Are you looking to enhance your Minecraft building skills? Building a roof is an essential part of creating a realistic and aesthetically pleasing structure in the game. Whether you’re constructing a cozy cottage or a grand castle, a well-built roof can make all the difference. In this step-by-step guide, we’ll walk you through the process of building a roof in Minecraft, from choosing the right materials to adding the finishing touches.
Before you begin, it’s important to have an idea of the type of roof you want to build. There are various styles to choose from, such as gabled roofs, hip roofs, and flat roofs. Each style has its own unique characteristics and requires different building techniques. Once you’ve decided on the style, you can gather the necessary materials.
The most common materials used for building roofs in Minecraft include wooden planks, stairs, and slabs. These can be crafted from different types of wood, such as oak, spruce, birch, jungle, acacia, and dark oak. It’s important to choose materials that complement the overall design of your structure. For example, if you’re building a rustic cabin, you might opt for oak planks and stairs. If you’re going for a more elegant look, spruce or dark oak might be a better choice.
Once you have your materials, you can start building the roof. Begin by creating the base layer using wooden planks or slabs. This will serve as the foundation for the rest of the roof. Next, you can add the sloped sections using stairs or slabs, depending on the style you’ve chosen. Experiment with different angles and patterns to create the desired effect. Finally, add any additional details, such as chimneys, skylights, or decorative elements, to give your roof a unique and personalized touch.
Building a roof in Minecraft may seem daunting at first, but with practice and patience, you’ll become an expert in no time. Follow this step-by-step guide and let your creativity soar. Whether you’re a beginner or a seasoned Minecraft player, building a roof can be a fun and rewarding experience. So grab your materials and get ready to create the perfect roof for your next Minecraft masterpiece!
Before you begin building a roof in Minecraft, you’ll need to gather the necessary materials. Here is a list of the materials you will need:
Make sure you have enough of each material to complete the entire roof. The exact amount will depend on the size of your structure and the design you choose.
Once you have gathered all the necessary materials, you are ready to move on to the next step of building your roof in Minecraft.
Building a roof in Minecraft can be a fun and rewarding project. Whether you’re looking to add some character to your house or protect your base from the elements, a well-designed roof can make all the difference. In this step-by-step guide, we’ll walk you through the process of building a roof that will not only protect your creations, but also add a touch of style to your build.
Materials
Before you start building your roof, you’ll need to gather some materials. The materials you’ll need will depend on the type of roof you want to build, but some common options include:
Design
Once you have your materials, it’s time to decide on the design of your roof. Minecraft offers a variety of roof styles, including gable roofs, hip roofs, and mansard roofs. Take some time to research different roof designs and find one that fits the style of your build.
Building
Now that you have your materials and design, it’s time to start building your roof. Follow these steps:
Finishing touches
Once your roof is complete, take a step back and admire your work. You can further enhance the look of your roof by adding details such as plants, banners, or even a weather vane.
Building a roof in Minecraft is a creative and enjoyable process. With the right materials and a bit of planning, you can create a roof that not only protects your build but also adds a unique touch to your Minecraft world.
After deciding on the size and shape of your roof, the next step is to choose a roof design. The design you choose will greatly impact the look and style of your building, so it’s important to consider your overall aesthetic and the functionality of the roof.
Read Also: Discover the Price of Call of Duty Black Ops 4 | Unveiling the Cost of the Popular FPS Game
Here are some popular roof designs to consider:
The gable roof, also known as a peaked or pitched roof, is one of the most common roof designs. It features two sloping sides that meet at a central ridge, forming a triangular shape. This design is known for its simple and classic look, as well as its ability to efficiently shed rainwater and snow.
The hip roof has slopes on all four sides, meeting at a point at the top. This design is popular for its stability, as the inward slopes help to distribute weight evenly. It also provides extra space for attics or vaulted ceilings. The hip roof design is commonly found in residential buildings.
The gambrel roof, often seen in barns or Dutch Colonial style homes, features two slopes on each side, with the lower slope being steeper than the upper slope. This design provides more usable space in the attic or upper levels, making it ideal for buildings that require extra storage or living space.
Read Also: Exploring the Unexpected Conclusion of The Wolf Among Us: Answers and Analysis
The mansard roof is characterized by having two slopes on all four sides, with the lower slope being steeper than the upper slope. This design is commonly found in French architecture and provides additional living space in the upper levels. It adds an elegant and distinctive look to buildings.
These are just a few examples of roof designs you can experiment with in Minecraft. Remember to take into consideration the size, shape, and purpose of your building when selecting a roof design. This will help you create a cohesive and visually appealing structure.
Choosing the right roof style can greatly enhance the overall appearance of your Minecraft build. Whether you’re constructing a cozy cottage or a sprawling castle, the roof style you choose will contribute to the overall aesthetic and functionality of your structure. Here are some popular roof styles to consider:
Consider the architectural style and purpose of your Minecraft build when choosing a roof style. Experiment with different combinations and find the one that best suits your vision. Remember, the roof is an integral part of your structure and can greatly impact its overall look and feel.
Now that you have the walls and the flooring in place, it’s time to build the roof for your Minecraft house.
There are several types of roofs you can choose from, including flat roofs, gable roofs, and hip roofs. Each design has its own unique style, so pick the one that suits your taste.
To construct a basic gable roof, follow these steps:
If you want to add some variation to your roof design, try incorporating different materials or adding dormer windows.
Remember to experiment and be creative with your roof design. Minecraft offers plenty of possibilities for unique and interesting roof shapes and styles.
Once you’ve built your roof, take a step back to admire your handiwork. You now have a completed house with a functional and stylish roof!
To build a roof in Minecraft, you will need materials such as wooden planks, stairs, slabs, or blocks depending on the style of roof you want to create. You can choose from different types of wood, stone, or even clay to give your roof a unique look.
To start building a roof in Minecraft, you will first need to decide on the design and shape you want. Then, gather the required materials and clear the area where you will be building the roof. Once everything is ready, you can start placing blocks and creating the structure of the roof.
The best shape for a roof in Minecraft depends on your personal preference and the style of your house or building. Some popular roof shapes include gable, hip, gambrel, and mansard roofs. Experiment with different shapes to find the one that suits your project the best.
Yes, there are several special techniques you can use when building a roof in Minecraft. For example, you can use upside-down stairs to create a curved or sloping roof. You can also mix different types of blocks or materials to add texture and variety to your roof.
Yes, you can definitely add windows or skylights to your Minecraft roof. This can be done by leaving spaces or openings in the roof structure and then placing glass panes or blocks in those areas. Adding windows and skylights can make your roof look more realistic and allow natural light to enter the building.
The time it takes to build a roof in Minecraft can vary depending on the size and complexity of the roof, as well as your building skills. A simple roof design can be completed in a matter of minutes, while a more intricate and detailed roof may take several hours or even days to finish.
Yes, you can customize the color of your Minecraft roof. This can be done by using different types of blocks or by applying a layer of dye to the blocks you are using. Experiment with different colors to create a roof that matches your desired aesthetic or fits in with the overall theme of your build.
Great Sword of Favonius Genshin Impact Are you ready to take on the challenges of Teyvat? Upgrade your arsenal with the Great Sword of Favonius in …
Read Article
How To Change Name Color On Clash Royale? If you’re a Clash Royale player, you may have noticed other players having cool colored names instead of the …
Read Article
How Much Money Has Among Us Made? Among Us, the popular online multiplayer game developed by InnerSloth, has taken the gaming world by storm. Since …
Read Article
What Is A Whiplash In Fortnite? If you’re an avid Fortnite player, you’ve probably come across the term “Whiplash” at some point. But what exactly is …
Read Article
Where To Find Carrots In Genshin Impact? If you’re playing Genshin Impact, you probably know that cooking is an essential part of the game. And what’s …
Read Article
How Did They Make Clash Of Clans? Clash of Clans is one of the most successful mobile games of all time, with millions of players around the world. …
Read Article


