


As Dusk Falls review: A deep dive into the captivating narrative and stunning visuals
As Dusk Falls review As Dusk Falls is a highly anticipated interactive drama adventure game that promises to deliver an immersive experience like no …
Read Article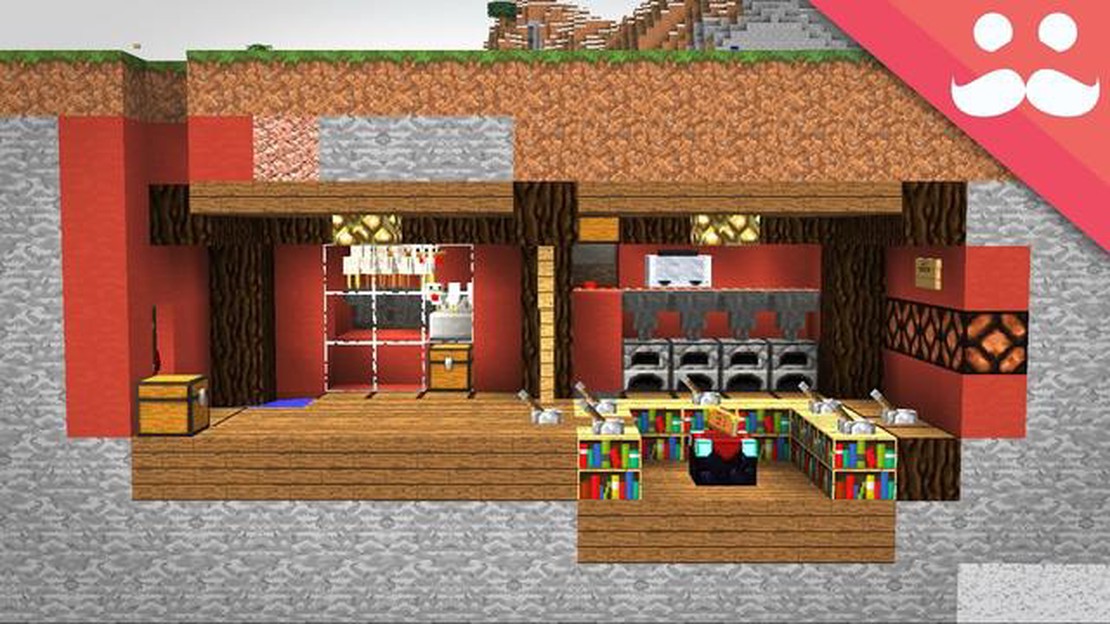
Are you tired of constantly being exposed to the dangers of the Minecraft world? Do you want a safe haven where you can store your valuable items and protect yourself from hostile mobs? Look no further than building a bunker in Minecraft! In this step-by-step guide, we will walk you through the process of constructing a sturdy and secure bunker that will keep you and your belongings safe from harm.
To start off, you’ll need to gather the necessary resources. Make sure you have enough blocks, such as stone or obsidian, to build the walls and roof of your bunker. Don’t forget about the door, which can be made from wood or iron. You may also want to gather some glass blocks for windows, so you can have a view of the outside without putting yourself at risk.
Once you have all the materials, find a suitable location to build your bunker. Look for an area that is flat and spacious enough to accommodate your desired bunker size. It’s also a good idea to choose a location that is not too close to other structures or caves, as this can increase the risk of mobs spawning nearby.
Next, mark out the area where your bunker will be built. Use blocks or markers to outline the shape of your bunker. Remember to leave space for a door and windows if desired. Start by placing the corner blocks and then connect them with the appropriate blocks to form the walls. Make sure the walls are at least three blocks high to provide enough headroom.
Continue building the walls until you reach your desired bunker height. Once the walls are complete, it’s time to work on the roof. Use the same material as the walls and create a solid layer to seal off your bunker. Don’t forget to leave an opening for the door and any windows you want to install.
Finally, add the finishing touches to your bunker. Install a door at the entrance and any windows you want on the walls. You can also decorate the inside of your bunker with torches, furniture, and storage chests to make it feel more like home. Don’t forget to test your bunker for any weak spots or areas where mobs could potentially enter.
With your bunker complete, you can now enjoy the peace of mind that comes with having a secure shelter in Minecraft. Whether you use it as a hidden base, storage facility, or a refuge during nighttime or dangerous situations, your bunker will provide you with the protection you need. So grab your tools, gather your resources, and start building your Minecraft bunker today!
Building a bunker in Minecraft requires careful planning and gathering the right materials. Here is a list of items you will need to gather before you start constructing your bunker:
Make sure to gather enough of each material before you start building your bunker. Planning and organization are key to building a successful and functional bunker in Minecraft.
When building a Minecraft bunker, it’s important to choose the right location for your structure. The ideal location will offer both practical and aesthetic benefits. Here are some factors to consider when finding the right location for your bunker:
By considering these factors, you can find the right location to build your Minecraft bunker. Once you have chosen the ideal spot, you can move on to the next steps in constructing your secure underground hideaway.
Before you start building your Minecraft bunker, it’s important to gather all the necessary resources. Below is a list of items you will need:
Make sure to gather all the necessary resources before starting the construction process. This will ensure a smooth building experience and prevent any delays in the construction of your Minecraft bunker.
Before you start building your Minecraft bunker, it’s important to prepare the ground where it will be located. This step is crucial for ensuring stability and functionality of your bunker.
1. Choose a suitable location:
Select a location that is flat and spacious enough to accommodate your bunker. Avoid areas with uneven terrain or obstacles that may obstruct the construction process.
2. Clear the area:
Remove any vegetation, rocks, or debris from the ground. It’s important to have a clean and clear area to work with.
Read Also: How to Heal in Minecraft: Tips and Tricks for Restoring Your Health
3. Level the ground:
Use a shovel or pickaxe to level the ground. Remove any high spots and fill in any low spots to create a smooth and even surface.
4. Plan the dimensions:
Determine the size and shape of your bunker. Use stakes or markers to outline the boundaries of the bunker on the ground.
5. Dig the foundation:
Use a shovel or excavator to dig out the foundation of your bunker. The depth and width of the foundation will depend on the size of your bunker. Make sure the foundation is deep enough to provide stability and support for the structure.
Read Also: Mastering the Shield in Coin Master: Tips and Tricks for Effective Gameplay
6. Clear underground obstacles:
If there are any underground obstacles such as rocks or roots, remove them to create a clear space for the bunker. This will prevent any future problems or obstacles during the construction process.
7. Fill and compact the foundation:
Fill the foundation with gravel or compacted soil to provide a solid base for your bunker. Compact the fill material to ensure stability and prevent settling or shifting of the bunker.
8. Install drainage system:
If your bunker will be located in an area prone to flooding, it’s important to install a drainage system. This will prevent water from seeping into your bunker. Consider using a French drain or other suitable drainage solution.
9. Level the foundation:
Check and adjust the level of the foundation to ensure it is even and smooth. This will help in the construction of the bunker walls and ensure that the structure is stable.
By following these steps, you will be well-prepared to start building your Minecraft bunker. The ground preparation process is essential for creating a sturdy and functional bunker that will withstand the test of time.
Before you start building your Minecraft bunker, you need to clear the area where you want to build it. This step is important because it allows you to have a clean slate and ensures that there are no obstructions that could interfere with the construction process.
Follow these steps to clear the area:
Once you have cleared the area, you are ready to start building your Minecraft bunker!
You will need materials such as cobblestone, iron bars, glass blocks, redstone, and various types of wood.
The time it takes to build a Minecraft bunker can vary depending on the size and complexity of the design, but it can take anywhere from a few hours to several days.
Yes, you can build a bunker underwater in Minecraft by creating an air pocket and using various water-proof materials.
Yes, there are several techniques and strategies you can use when building a Minecraft bunker, such as using redstone for hidden entrances and traps, implementing a layered defense system, and incorporating natural terrain features for added protection.
As Dusk Falls review As Dusk Falls is a highly anticipated interactive drama adventure game that promises to deliver an immersive experience like no …
Read Article
Fallout 4 review Fallout 4 is the latest installment in the critically acclaimed Fallout series developed by Bethesda Game Studios. This highly …
Read Article
Panzer Corps 2 review Panzer Corps 2 is a highly anticipated strategy game that takes players back to the historic battles of World War II. Developed …
Read Article
What Are Rock Pokemon Weak Against? Rock-type Pokemon have always been a formidable force in the world of Pokemon battles. With their sturdy defenses …
Read Article
How To Take Snapshot Pokemon Go? In the popular augmented reality game Pokemon Go, one of the features that players love is the ability to take …
Read Article
Stray: How to unlock the atomic battery Stray is an upcoming video game that has been generating a lot of buzz in the gaming community. Developed by …
Read Article


