

The Best Sykov Loadouts for Warzone - Get Ready for Victory!
The best Sykov loadouts for Warzone If you’re a fan of Call of Duty: Warzone, you know how important it is to have the right loadout. And when it …
Read Article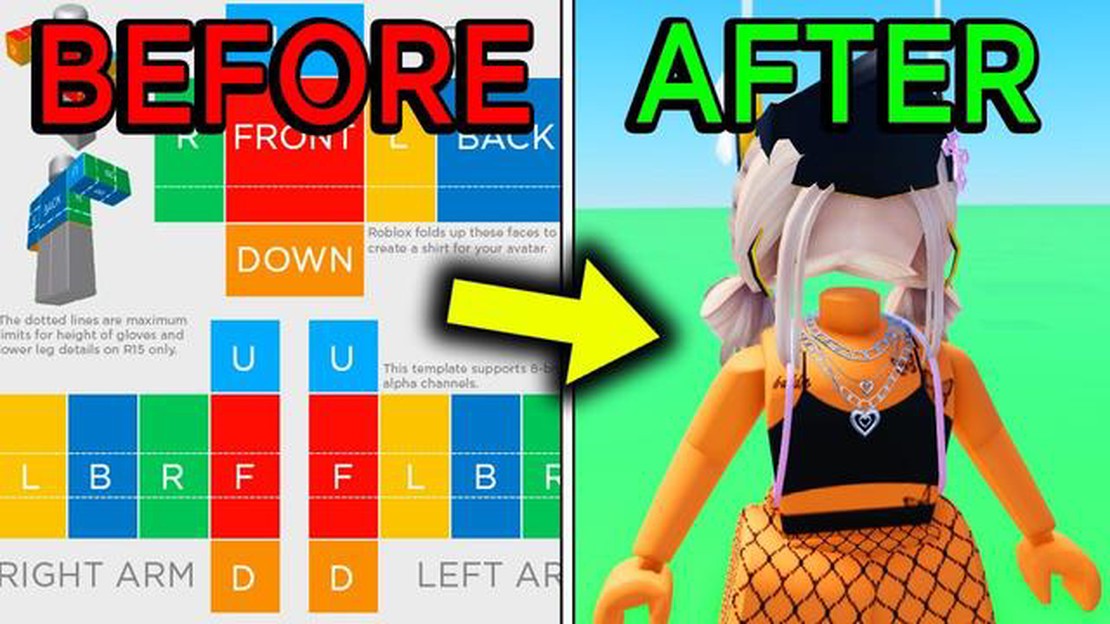
If you’re an avid Roblox player, you’ve probably noticed that everyone is wearing unique and custom-designed shirts. Ever wondered how they do it? Creating your own Roblox shirt is easier than you think! In just a few simple steps, you’ll be able to design and wear your very own personalized shirt in Roblox.
In this step-by-step guide, we’ll walk you through the process of making a Roblox shirt from scratch. Don’t worry if you don’t have any prior design experience – we’ve got you covered. Whether you want to create a simple logo or a complex pattern, we’ll provide you with all the tools and tips you need to bring your vision to life.
First, we’ll show you how to set up a template for your shirt using a graphics editing software like Photoshop or GIMP. Then, we’ll guide you through the process of designing your shirt, including choosing colors, adding images, and applying patterns or text. Finally, we’ll explain how to upload your finished design to Roblox and wear it proudly in the game.
So, let’s get started! Whether you want to express your creativity, promote your brand, or simply stand out from the crowd, learning how to create your own Roblox shirt is a skill worth mastering. Follow our step-by-step guide and unleash your imagination – the possibilities are endless!
If you are an avid Roblox player and want to customize your avatar’s look, creating your own Roblox shirt is a great way to do it. In this step-by-step guide, we will walk you through the process of creating your own shirt in Roblox.
Step 1: Open the Roblox Studio
First, open the Roblox Studio on your computer. This is the tool you will use to create your shirt design.
Step 2: Create a New Shirt Template
In the Roblox Studio, go to the “File” menu and select “New.” Then, choose the “Baseplate” template. This will create a new project for your shirt design.
Step 3: Design Your Shirt
Now it’s time to unleash your creativity! Use the various tools and options available in the Roblox Studio to design your shirt. You can use shapes, colors, patterns, and even upload your own images to create a unique design.
Step 4: Save Your Shirt Design
Once you are happy with your shirt design, go to the “File” menu and select “Save.” Give your shirt design a name and save it as an image file on your computer.
Read Also: Explore All the Methods to Escape Fort Joy in Divinity: Original Sin 2
Step 5: Upload Your Shirt Design to Roblox
Go to the Roblox website and login to your account. From there, go to the “Create” section and select “Shirts.” Click on the “Choose File” button and select the shirt design file you just saved on your computer. Then, click “Upload” to upload your shirt design to Roblox.
Step 6: Test and Wear Your Shirt
Once your shirt design is uploaded, you can test it out in Roblox Studio. Open the “Avatar” section and select the shirt you just created. Put it on your avatar and see how it looks!
Step 7: Share Your Shirt Design
If you are proud of your shirt design, you can share it with the Roblox community. Go to the “Develop” section and select “Shirts.” Find your shirt design and click on the “…” button. From there, you can choose to make your shirt Public or Limited and set a price for it.
Read Also: Diablo 4 player spends 30 billion gold on a crossbow before Blizzard disables trading
Congratulations! You have successfully created your own Roblox shirt. Now you can show off your unique style to other players in the Roblox community.
If you are a Roblox player and want to customize your avatar with your own unique style, creating your own Roblox shirt can be a great way to do that. With just a few simple steps, you can design and upload your own shirt to wear in the game. Follow these instructions to get started:
Congratulations! You have successfully created and uploaded your own Roblox shirt. Now, you can wear your custom shirt in Roblox and showcase your unique style to the community.
Note: When creating shirts for Roblox, it is important to follow the platform’s guidelines and rules. Make sure your design is appropriate and does not violate any terms of service or copyright infringement.
Creating your own shirt design on Roblox is a fun and creative process. Here are the easy steps you can follow to design your own shirt:
Designing your own shirt on Roblox is a great way to express your creativity and stand out in the Roblox community. Enjoy the process and have fun designing!
Roblox is an online platform that allows users to create and play games. It also has a virtual economy where users can buy and sell virtual items.
Yes, you can create your own shirt in Roblox. The platform allows users to customize their avatar’s clothing, including shirts.
To create your own shirt in Roblox, you will need to use a program like Photoshop or GIMP to design the shirt. Once you have your design ready, you can upload it to Roblox and use their tools to create the shirt template. Then, you can apply the template to your avatar’s clothing in the game.
Yes, there are some requirements and guidelines for creating a shirt in Roblox. The image you use for your shirt design should be in a specific format (PNG with a transparent background) and size (585x559 pixels). Additionally, there are content guidelines that you must follow, which prohibit inappropriate or copyrighted content.
Yes, there are some limitations to creating a shirt in Roblox. For example, free users can only create shirts using the basic template provided by Roblox, while members of the Builders Club have access to more advanced customization options. Additionally, there may be limitations on the complexity of the design or the number of shirts you can create.
The best Sykov loadouts for Warzone If you’re a fan of Call of Duty: Warzone, you know how important it is to have the right loadout. And when it …
Read Article
How To Gigantamax Pokemon? Gigantamaxing is a new feature introduced in Pokémon Sword and Shield. It allows certain Pokémon to become much larger and …
Read Article
How To Change Chat Mode In Among Us? Among Us has become a popular online multiplayer game that keeps players on their toes as they try to identify …
Read Article
How To Play Genshin Impact With Controller On Android? Genshin Impact is a popular open-world action role-playing game that has captivated players …
Read Article
What Is The Best Epic Brawler In Brawl Stars 2022? Brawl Stars is a popular mobile multiplayer game developed by Supercell. With its fast-paced …
Read Article
How To Get Reputation In Genshin Impact? Genshin Impact is a popular action role-playing game that offers players a vast open world to explore. One …
Read Article


