


Ultimate Guide: How To Farm Mobile Legends Efficiently?
How To Farm Mobile Legends? Mobile Legends is one of the most popular mobile games worldwide, and farming is a crucial aspect of the game that every …
Read Article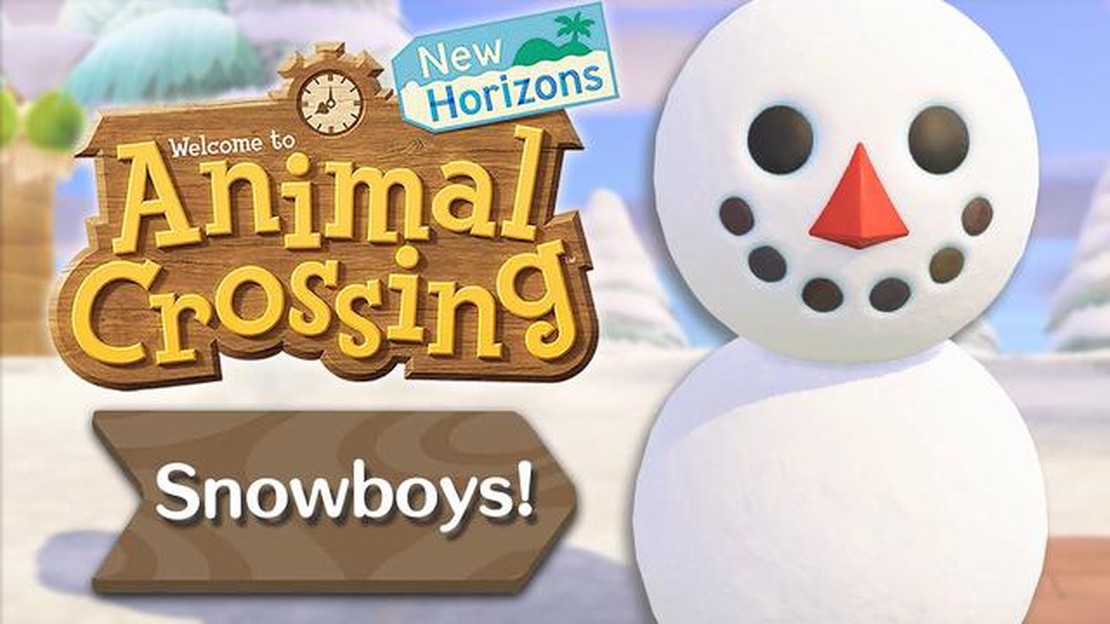
Are you a fan of Animal Crossing? Do you want to bring some winter magic to your in-game island? Look no further! In this step-by-step guide, we will show you how to create a Snowfolk in Animal Crossing. Snowfolk are adorable snowmen that you can build during the winter season in the game. They add a fun and festive touch to your island and can even give you some special rewards! Follow along and let’s get started!
Step 1: Gather materials
Before you can start building your Snowfolk, you will need to gather the necessary materials. The main ingredient for building a Snowfolk is snowballs, which can be found scattered around your island during the winter months. Roll these snowballs around until they become large enough to create the body and head of your snowman.
Step 2: Build the body
Once you have two large snowballs, it’s time to start building the body of your Snowfolk. Roll one snowball in the desired location for the body, and then push the second snowball on top to create the head. Make sure the body and head are properly aligned to give your Snowfolk a stable base.
Step 3: Add the features
Now comes the fun part – adding the features to your Snowfolk! Use small snowballs to create the eyes, buttons, nose, and mouth. You can also use sticks, stones, or other items to give your snowman a unique personality. Be as creative as you like!
Step 4: Customize your Snowfolk
Finally, it’s time to customize your Snowfolk. Use different patterns and designs to give your snowman a distinctive look. You can decorate them with accessories like hats, scarves, and even glasses. Let your imagination run wild and make your Snowfolk truly stand out!
Create a whole family of Snowfolk and enjoy the winter wonderland on your Animal Crossing island. Don’t forget to interact with your Snowfolk daily to keep them happy and receive special rewards. Have fun and embrace the winter season with these adorable and festive additions to your in-game world!
Read Also: How to Counter Raid in Coin Master: Tips and Strategies
In Animal Crossing, players can enjoy building snowfolk during the winter season. These charming snow figures come in different sizes and shapes and can be a delightful addition to your island. Follow this step-by-step guide to create your very own adorable snowfolk:
Keep in mind that snowfolk have a limited lifespan and will eventually melt away. Enjoy the time you have with them and create new ones whenever you can. Have fun building your snowfolk and spreading winter cheer in Animal Crossing!
When creating a Snowfolk in Animal Crossing, you will need to gather a few materials to complete the process. Here is a list of the materials you will need:
Once you have gathered all the necessary materials, you will be ready to start building your Snowfolk in Animal Crossing.
To create a Snowfolk in Animal Crossing, follow these steps:
Remember, snow in Animal Crossing is temporary and will eventually melt. Enjoy your Snowfolk while it lasts and have fun creating new ones whenever it snows!
Read Also: How to Catch Shiny Pokemon: A Guide to Finding and Capturing Rare Shiny Pokemon
Once you have created your snowfolk, it’s time to start adding some personal touches to make it truly unique. From accessories to customization options, there are plenty of ways to decorate your snowfolk and give it some character. Here are some ideas to get you started:
Remember, the possibilities for decorating and personalizing your snowfolk are endless. Get creative and have fun making your snowfolk a unique and cherished resident of your Animal Crossing island!
To create a Snowfolk in Animal Crossing, you will need two snowballs, which can be found around your island during the winter season.
You can find snowballs scattered around your island during the winter season. They typically appear in open areas with no trees or buildings. Make sure to roll them carefully without hitting any obstacles.
Once you have found two snowballs, you need to gather them together to create a Snowfolk. Roll one snowball around until it becomes larger, then push it close to the other snowball and gently nudge it to attach them together.
The bottom snowball, also known as the body, should be slightly larger than the top snowball, which forms the head. The exact size may vary, but make sure the body is big enough for the head to sit comfortably on top.
Yes, you can customize the appearance of your Snowfolk in Animal Crossing. After creating the basic structure, you can use various objects like hats, clothes, and accessories to decorate your Snowfolk and give it a unique look.
Once you finish creating the Snowfolk, it will come to life and interact with you. It may ask for different items or tasks, and completing them will reward you with various winter-themed items or DIY recipes.
How To Farm Mobile Legends? Mobile Legends is one of the most popular mobile games worldwide, and farming is a crucial aspect of the game that every …
Read Article
What Time Does Genshin Impact Reset? Genshin Impact is an immensely popular open-world action role-playing game developed by miHoYo. One of the key …
Read Article
Lucky Friendship Pokémon Go Are you tired of searching high and low for rare Pokémon in Pokémon Go? Look no further – Lucky Friendship has got you …
Read Article
What Is Call Of Duty Vanguard? Gamers around the world are eagerly awaiting the release of Call of Duty Vanguard, the latest installment in the …
Read Article
Homa Staff Genshin Impact Genshin Impact is a popular action role-playing game that offers players a vast open world to explore. One of the many …
Read Article
How To Get Hoopa In Pokemon Go? Welcome to our ultimate guide on how to get Hoopa in Pokemon Go! Hoopa, the Mischief Pokemon, is a mythical Pokemon …
Read Article


