


What Coding Language Does Roblox Use?
What Programming Language is Used by Roblox - A Developer’s Guide Roblox is a popular online platform that allows users to create and play games. If …
Read Article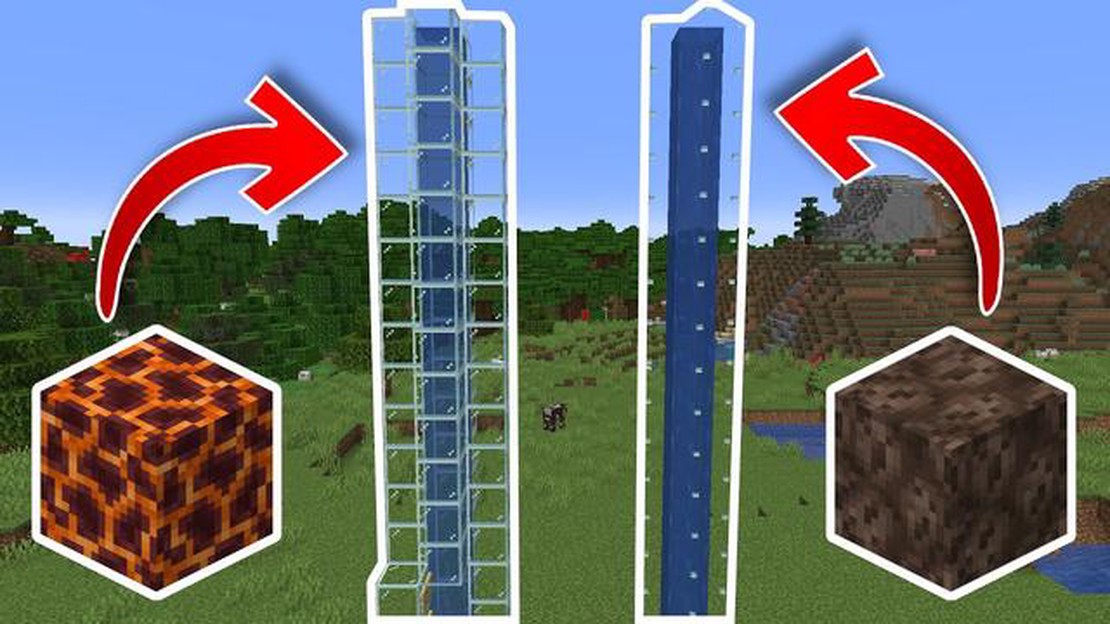
If you’ve ever found yourself struggling to navigate the depths of Minecraft’s vast underground caves and tunnels, a water elevator may just be the solution you’ve been looking for. A water elevator is a simple contraption that uses flowing water to transport you vertically. Whether you’re looking to quickly ascend to the surface or efficiently descend into the depths, this guide will walk you through the steps of creating your very own water elevator in Minecraft.
Step 1: Gather the necessary materials.
The first step in building a water elevator is to gather the necessary materials. You will need a bucket, water source blocks, signs, and a building block of your choice. Make sure you have enough of each material to construct the desired height of your water elevator.
Step 2: Dig a vertical shaft.
Once you have your materials, dig a vertical shaft in the location where you want your water elevator to be. The width of the shaft should be one block wider than your desired elevator width. Make sure there are no obstacles or other structures in the way of your shaft.
Step 3: Place water source blocks.
Next, place water source blocks at the bottom of your shaft. To do this, use your bucket to collect water from a nearby source and place it at the bottom block of your shaft. The water will flow and fill the entire shaft, creating a column of flowing water.
Step 4: Add signs for stopping points.
To create stopping points in your water elevator, place signs horizontally on the inside of the shaft. These signs will act as barriers and allow you to stop at different levels. Make sure the signs are evenly spaced apart and at the desired levels.
Step 5: Build the elevator walls.
Finally, build the walls of your water elevator using the building blocks of your choice. These walls will contain the water and create a structure for you to ride up and down. Make sure to enclose the entire shaft, including the stopping points created by the signs.
And that’s it! You’ve successfully created a water elevator in Minecraft. You can now use this contraption to quickly and efficiently navigate the depths of your world. Happy exploring!
Water elevators are a useful and efficient way to move vertically in Minecraft. They work by using water currents to lift the player up or down. Here is a step-by-step guide on how to make a water elevator in Minecraft.
That’s it! You have successfully created a water elevator in Minecraft. Now you can easily move up and down vertical distances in the game.
In order to make a water elevator in Minecraft, you will need the following materials:
Read Also: The Top Gaming Headsets in Australia for 2023
These are the basic materials required for making a water elevator in Minecraft. You can also add additional decorations or features based on your preference and creativity.
Make sure you have all the necessary materials before starting the construction of the water elevator.
To create a water elevator in Minecraft, the first step is to dig a vertical shaft. This will serve as the main structure for your elevator. You can dig the shaft as deep as you like, but keep in mind that the longer your elevator, the more resources you will need.
Start by selecting a location where you want your elevator to be. It should be close to a water source, as you will need water for your elevator to work properly. Once you’ve chosen a location, start digging straight down. Make sure the shaft is wide enough to fit your character comfortably. You can dig the shaft using any tool you prefer, such as a pickaxe or shovel.
Read Also: XCOM 2: War of the Chosen Long War Overhaul - Enhanced Gameplay and Content
As you dig, be careful not to dig too far down or you may fall and take fall damage. Also, watch out for any caves or underground structures that may intersect with your shaft. These can be obstacles and may need to be cleared out or worked around.
Once you’ve reached your desired depth, your vertical shaft is complete. You are now ready to move on to the next step of creating your water elevator.
Once you have built your water shaft, the next step is to place signs along the shaft to create the water elevator. The signs will act as barriers to prevent the water from flowing down the shaft and to guide the player upwards.
Placing signs along the shaft is an essential step in creating a functional water elevator in Minecraft. The signs create a barrier that contains the water and allows the player to move vertically. Make sure to place the signs properly and at regular intervals to ensure a smooth and efficient elevator. Now that you have completed this step, you can move on to the next step of creating your water elevator.
Now that you have created the base and built the shaft for your water elevator, it’s time to add the water source blocks. These source blocks will allow the water to flow and create the elevator effect.
To add the water source blocks, follow these steps:
Important: Make sure that all the water source blocks are positioned correctly and flow downwards. If the water flows in the wrong direction or creates sources where you don’t want them, you can remove and replace the blocks until it’s set up correctly.
Once you have added the water source blocks and they are flowing down the shaft, your water elevator is complete! You can now step into the column of water and be lifted up or down the shaft with ease.
To make a water elevator in Minecraft, you will need signs, water source blocks, and a soul sand block. First, dig a vertical shaft in the ground. Place water source blocks at the bottom of the shaft, and stack signs on top of each other to create a column. Finally, place the soul sand block at the bottom of the shaft. When you step into the column of water, the soul sand will create bubbles that will push you up. This creates a water elevator.
To make a water elevator in Minecraft, you will need signs, water source blocks, and a soul sand block. Signs are used to create a column, Water source block to create a continuous flow of water and soul sand block to create bubbles that push you up.
No, you cannot make a water elevator in Minecraft without using signs. Signs are an important component of the water elevator as they provide the structure for the column of water that pushes you up.
Yes, it is possible to make a water elevator in survival mode in Minecraft. All the materials needed for a water elevator can be obtained in survival mode, including signs, water source blocks, and soul sand. You just need to gather the necessary resources and follow the steps in the guide to create your water elevator.
The purpose of a water elevator in Minecraft is to provide a quick and efficient way to move vertically. Instead of using ladders or stairs, a water elevator allows you to move up and down easily by swimming in the column of water. This can be particularly useful for navigating tall structures or mineshafts.
Yes, there are alternative methods for creating a water elevator in Minecraft. One alternative method involves using soul campfires instead of soul sand. Soul campfires create blue smoke particles that push you up, similar to the bubbles created by soul sand. Other alternatives include using buckets of water and dispensers to create flowing water, or using ice blocks and pistons to create an ice elevator.
What Programming Language is Used by Roblox - A Developer’s Guide Roblox is a popular online platform that allows users to create and play games. If …
Read Article
How to Repair an Anvil in Minecraft Repairing an anvil in Minecraft is a crucial skill for any player looking to keep their tools and equipment in top …
Read Article
What Was Roblox Initially Called? Exploring the Origins of the Popular Gaming Platform Roblox is a popular online gaming platform that has gained …
Read Article
A fight in the Zelda: Tears of the Kingdom mod scene has revealed the ugly side of emulation fandom Emulation has long been a topic of debate in the …
Read Article
How Long Is Sony�s Contract With Call Of Duty? Call of Duty is one of the most popular video game franchises in the world, known for its intense …
Read Article
How To Download Call Of Duty Remastered? Call of Duty Remastered is a nostalgia-inducing game that brings back the original Call of Duty experience …
Read Article


