


Why Can't I Type On Among Us? Discover the Solutions Here
Why Can�t I Type On Among Us? If you’re a fan of Among Us and are experiencing issues with typing in the game, you’re not alone. Many players have …
Read Article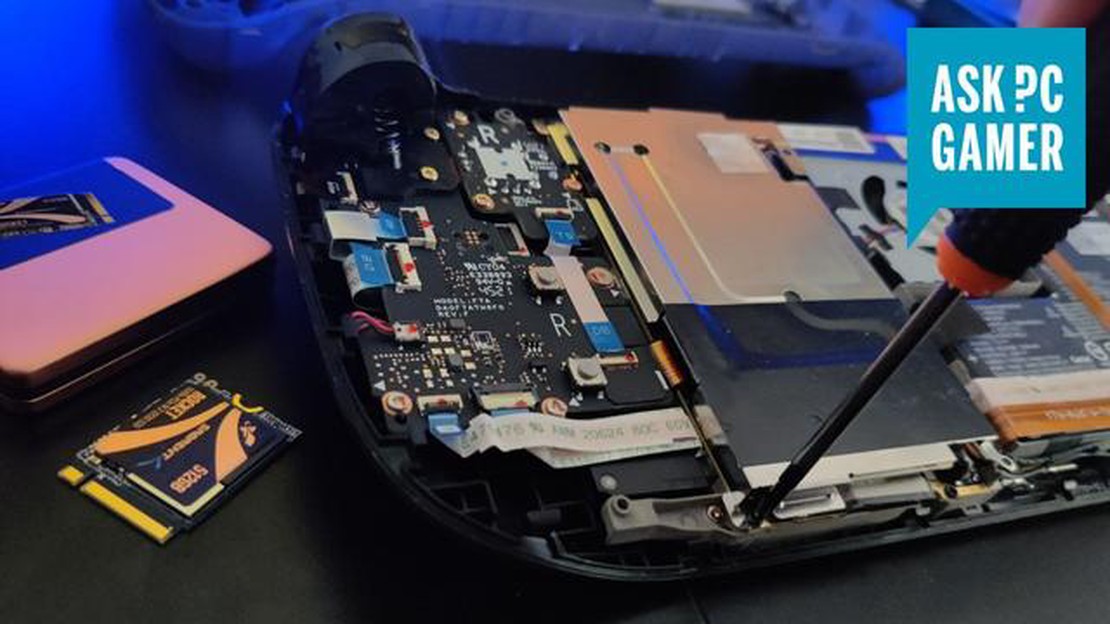
In the world of portable gaming, the Steam Deck has quickly become a fan-favorite. With its powerful hardware, ergonomic design, and extensive game library, it’s no wonder gamers are flocking to get their hands on this device. However, as with any electronic device, there may come a time when you want to upgrade certain components, such as the SSD.
Upgrading the SSD on your Steam Deck can provide you with more storage space for games, faster loading times, and an overall improved gaming experience. The good news is that upgrading the SSD on your Deck is relatively easy and can be done without losing any of your data. Whether you’re a seasoned pro or a novice, this guide will walk you through the steps to successfully clone your Deck’s SSD.
Cloning your Steam Deck’s SSD essentially means creating an exact copy of your current SSD onto a new SSD. This ensures that all your data, including your games, saves, and settings, are transferred seamlessly to the new SSD. To begin the cloning process, you’ll need a few things: a new SSD that is compatible with the Steam Deck, an external SSD enclosure, and cloning software.
Once you have all the necessary equipment, you can follow our step-by-step guide to clone your Steam Deck’s SSD. We’ll cover everything from connecting the new SSD to your Deck using the external enclosure to initiating the cloning process using the software. With a bit of patience and careful following of the instructions, you’ll have a new, upgraded SSD in no time without losing any of your precious gaming data.
The Steam Deck, Valve’s new handheld gaming device, is making waves in the gaming community. With its powerful hardware and ability to run PC games on the go, it’s an enticing option for gamers. However, one aspect that some users may overlook is the SSD, or solid-state drive, that comes with the device.
While the default SSD that comes with the Steam Deck is sufficient for most users, there are several reasons why you should consider upgrading it:
By upgrading the SSD, you can significantly increase the storage capacity of your Steam Deck. This means you can install and store more games, videos, and other media without worrying about running out of space.
A faster SSD can greatly reduce load times in games. With an upgraded SSD, you’ll experience shorter loading screens and smoother gameplay overall.
A more powerful SSD can improve the overall performance of your Steam Deck. Games and applications will launch faster, and you may experience fewer stutters or slowdowns during gameplay.
By upgrading the SSD, you have the flexibility to choose a brand or model that best suits your needs. You can opt for a high-performance SSD or one with larger storage capacity, depending on your preferences.
Upgrading the SSD allows you to future-proof your Steam Deck. As games and applications become more demanding, having a faster and larger storage solution will ensure that you can continue to enjoy the latest releases without any compromises.
Overall, while the default SSD on the Steam Deck is perfectly functional, considering an upgrade can provide additional benefits and enhance your gaming experience. It’s a worthwhile investment for those who want more storage, faster load times, and improved performance.
The Steam Deck SSD upgrade offers improved performance and storage capacity for gamers. This means that players can enjoy faster loading times, smoother gameplay, and increased storage space for their games and files.
Read Also: How Old Is Fortnite? Find Out the Game's Release Date and Age
With the upgraded SSD, gamers can expect faster boot-up times and quicker game installations. This is especially beneficial for large games with long loading times, as players can get into the action faster.
Additionally, the increased storage capacity allows gamers to install more games on their Steam Deck without worrying about running out of space. This means that players can have a larger library of games readily available to play without the need to constantly delete and reinstall games.
Read Also: Mastering Fanny Mobile Legends: A Comprehensive Guide to Playing the Hero
Furthermore, the improved SSD performance enhances the overall gaming experience. Games will run more smoothly and seamlessly, with reduced lag and stuttering. This is particularly important for fast-paced and competitive games, where split-second reactions and precision are crucial.
In summary, the Steam Deck SSD upgrade provides gamers with improved performance and storage capacity, resulting in faster loading times, smoother gameplay, increased storage space, and an overall enhanced gaming experience.
When upgrading the SSD on your Steam Deck, you might be concerned about losing your important files and data. However, transferring your data to a new SSD can be a simple and seamless process. Here are some easy steps to ensure a smooth data transfer without any loss.
By following these simple steps, you can easily transfer your data to a new SSD without losing any files. This ensures a smooth transition to a larger storage capacity or a faster SSD on your Steam Deck.
With the ability to upgrade the SSD on your Steam Deck, you can now enjoy a seamless gaming experience with increased storage capacity. Whether you want to install more games or have faster load times, upgrading your SSD allows you to tailor your Steam Deck to meet your gaming needs.
Here are some reasons why upgrading your Steam Deck’s SSD can enhance your gaming experience:
Upgrading the SSD on your Steam Deck is a straightforward process that allows you to customize your gaming experience. You can choose the SSD capacity and performance level that suits your needs and preferences. With a seamless gaming experience, you can fully immerse yourself in the world of gaming on your upgraded Steam Deck.
The process of upgrading the SSD on a Steam Deck involves cloning the existing SSD to a new one using specialized software and then replacing the old SSD with the new one. This allows you to transfer all your data and settings without losing anything.
Yes, it is possible to upgrade the SSD on a Steam Deck without losing any data by cloning the existing SSD to a new one. This ensures that all your data and settings are transferred to the new SSD without any loss.
There are several software and tools available that can be used to clone the SSD on a Steam Deck. Some popular options include Clonezilla, Macrium Reflect, and Acronis True Image. These software offer easy-to-use interfaces and step-by-step instructions to help you clone your SSD.
You can upgrade the SSD on a Steam Deck yourself without needing professional help. With the right software and tools, the process is relatively straightforward and can be done by following step-by-step instructions. However, if you are not comfortable with technical tasks, it is recommended to seek professional assistance.
Yes, there are a few limitations and requirements for upgrading the SSD on a Steam Deck. Firstly, the new SSD you wish to install must be compatible with the Steam Deck and meet the required specifications. Additionally, you will need a separate computer or device to perform the cloning process. Lastly, it is important to ensure that you have a backup of all your data before proceeding with the upgrade.
Why Can�t I Type On Among Us? If you’re a fan of Among Us and are experiencing issues with typing in the game, you’re not alone. Many players have …
Read Article
Dell G5 15 SE gaming laptop review The Dell G5 15 SE Gaming Laptop is a powerful and versatile device that caters to gamers looking for a …
Read Article
What Is Mobile Legends Bang Bamg Called On A Pc? Mobile Legends Bang Bang is a popular multiplayer online battle arena (MOBA) game that has gained a …
Read Article
When Is Set Blast On Coin Master? In the addictive mobile game Coin Master, one of the most exciting events is the Set Blast. Set Blast is a …
Read Article
What Is A Cooldown In Clash Of Clans? Clash of Clans is a popular mobile strategy game where players build and upgrade their own village, train …
Read Article
What Is Clash Of Clans Personal Break? Clash of Clans is a popular mobile strategy game developed by Supercell. It allows players to build and …
Read Article


