


Step-by-Step Guide: Building a Defensive Wall in Sons of the Forest
How to build a defensive wall in Sons of the Forest If you’re playing the survival horror game Sons of the Forest, one essential aspect of surviving …
Read Article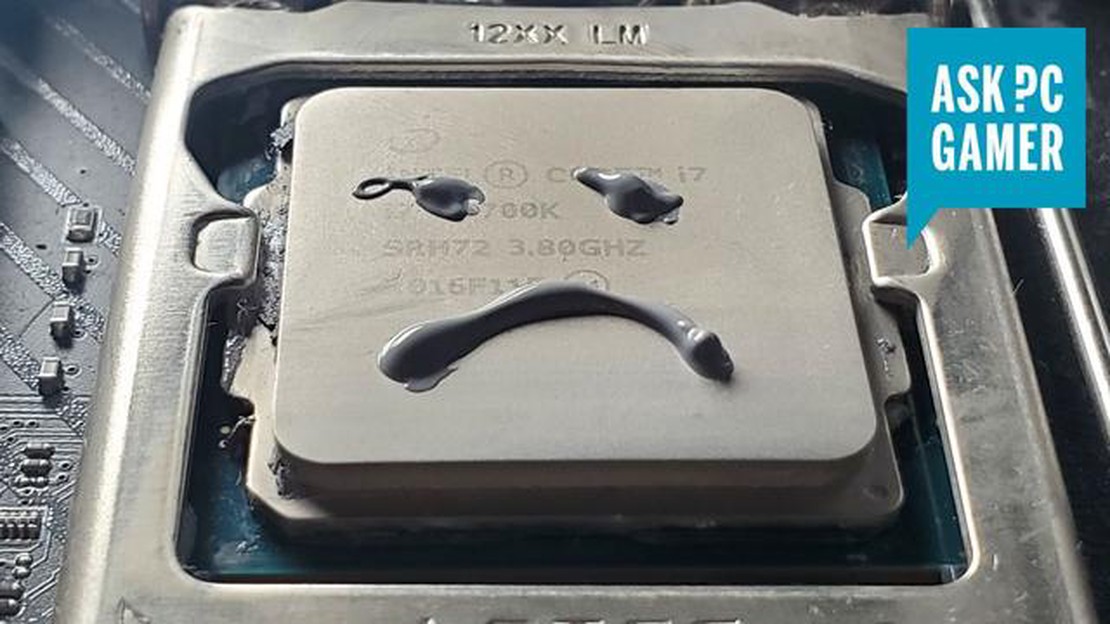
Thermal paste, also known as thermal grease or thermal compound, is a crucial component in keeping your computer’s CPU cool. It helps improve the transfer of heat between the CPU and the heat sink, ensuring that your processor operates at optimal temperatures. However, applying thermal paste correctly is essential to maximize its performance and prevent any potential issues.
Step 1: Cleaning the CPU and heat sink
Before applying thermal paste, it is crucial to remove any existing paste or debris from the CPU and heat sink. Use isopropyl alcohol and a lint-free cloth or cotton swab to clean both surfaces thoroughly. Ensure that there is no residue left behind, as this can affect the performance of the thermal paste.
Step 2: Applying the thermal paste
Once the surfaces are clean, it’s time to apply the thermal paste. The general rule of thumb is to use a small, pea-sized amount of paste in the center of the CPU. Avoid applying too much paste, as an excess can lead to overheating or poor heat transfer. Spread the paste evenly using a plastic spatula or a clean finger, making sure to cover the entire surface of the CPU.
Step 3: Mounting the heat sink
After applying the thermal paste, carefully place the heat sink on top of the CPU, aligning the mounting brackets or screws with the corresponding holes on the motherboard. Apply even pressure to ensure a proper connection. Avoid twisting or shifting the heat sink once it is in place, as this can disrupt the thermal paste’s effectiveness.
Step 4: Verifying the installation
Once the heat sink is mounted, check to ensure that it is securely attached and there are no gaps between the CPU and the heat sink. Uneven pressure or improper installation can cause air pockets, affecting the thermal paste’s ability to transfer heat. Use a thermal monitoring program to monitor the CPU temperatures and ensure that they remain within the acceptable range.
By following these steps, you can correctly apply thermal paste and ensure optimal performance from your computer’s CPU. Remember to clean the surfaces thoroughly, apply the right amount of paste, mount the heat sink properly, and verify the installation for the best results.
Properly applying thermal paste is crucial for ensuring optimal performance and temperature management in your computer. Follow these step-by-step instructions to apply thermal paste correctly:
Remember to always refer to the manufacturer’s instructions for your specific CPU cooler and thermal paste. Following these steps will help optimize your computer’s cooling performance and prevent overheating.
Before applying thermal paste, it’s important to ensure that the surface of the CPU and the heat sink are clean and free from any debris or old thermal paste residue. Here’s how to prepare the surface for optimal thermal paste application:
By properly preparing the surface, you can ensure that the thermal paste will make good contact with both the CPU and the heat sink, allowing for efficient heat transfer and optimal performance.
Before applying the thermal paste, make sure that both the CPU and the heat sink are clean and free from any dust or debris. Use a lint-free cloth or isopropyl alcohol to clean the surfaces.
Read Also: How to Get Free Pokemon in Pokemon Go: Tips and Tricks
Tip: You can also use the “dot method” by placing a small dot of thermal paste on the center of the CPU and letting the pressure from the heat sink spread it out.
2. Secure the heat sink in place using the provided screws or mounting brackets. Tighten them evenly in a diagonal pattern to ensure proper mounting pressure. 3. Once the heat sink is securely attached, double-check that the thermal paste is evenly spread and there are no excesses or gaps. Use a flashlight or a bright light to inspect the contact area.
Read Also: 6 Top Tips to Get More Brawlers in Brawl Stars 2022
Note: Different CPUs and heat sinks may require different application methods and amounts of thermal paste. Always refer to the manufacturer’s instructions or guidelines for specific recommendations.
Once you have applied the thermal paste to the center of the heatsink or CPU, it’s important to spread it evenly to ensure maximum heat transfer. Uneven distribution of thermal paste can result in hot spots and poor performance.
There are several methods you can use to spread the thermal paste, but the most common and effective technique is the “pea method.” Here’s how to do it:
It’s important not to use too much force or press too hard, as this can cause air bubbles and reduce the effectiveness of the thermal paste. Aim for a smooth and even layer that covers the entire surface.
If you prefer a different method, you can also use the “line method” or the “X method” to spread the thermal paste. The line method involves applying a thin line of thermal paste across the center of the heatsink or CPU, while the X method involves applying four small dots of thermal paste in each corner and then spreading them in an X pattern.
Regardless of the method you choose, be sure to follow the manufacturer’s guidelines and recommendations for applying thermal paste. Each CPU and heatsink may have specific instructions for optimal application.
Now that the thermal paste has been applied correctly, it’s time to secure the heatsink or CPU cooler in place. This step is crucial to ensure proper heat dissipation and prevent any damage to the components.
Here are the steps to secure the heatsink or CPU cooler:
It’s important to follow the manufacturer’s instructions for securing the heatsink or CPU cooler, as different models may have different mounting mechanisms. Make sure to also consult the motherboard manual for any specific guidelines or restrictions.
Once the heatsink or CPU cooler is securely in place, you can proceed to reconnecting any fans or cables that were disconnected during the installation process.
With the heatsink or CPU cooler properly secured, your thermal paste application is complete. The next step is to power on your computer and monitor the temperatures to ensure optimal performance and cooling efficiency.
Applying thermal paste correctly is essential for optimal performance because it helps to transfer heat from the processor to the heat sink. If thermal paste is not applied properly, it can lead to overheating of the processor, which can cause performance issues and even damage the hardware.
The frequency of applying thermal paste depends on several factors, such as the type of thermal paste used and the specific hardware. In general, it is recommended to reapply thermal paste every 1-2 years, or whenever you notice a decrease in performance or higher than usual temperatures.
The correct amount of thermal paste to apply is a small pea-sized dot in the center of the processor. Applying too much thermal paste can lead to overheating, while applying too little can result in poor heat transfer. It is important to strike the right balance to ensure optimal performance.
Yes, it is important to clean off the old thermal paste before applying new paste. Old thermal paste can dry out and become less effective over time, leading to poor heat transfer. You can use isopropyl alcohol and a lint-free cloth or cotton swab to carefully clean off the old paste before applying the new one.
While there are many types of thermal paste available in the market, it is recommended to use high-quality thermal paste that is specifically designed for computer hardware. Different types of thermal paste have different thermal conductivity properties, so using the right type can ensure optimal heat transfer and performance.
How to build a defensive wall in Sons of the Forest If you’re playing the survival horror game Sons of the Forest, one essential aspect of surviving …
Read Article
How Much Is My Fortnite Account Worth? Fortnite has taken the gaming world by storm, becoming one of the most popular battle royale games on the …
Read Article
How To Get House In Animal Crossing? Animal Crossing is a popular video game series that allows players to enjoy a relaxing life in a virtual village …
Read Article
When will Zombie Mode come out in Call of Duty Mobile Call of Duty Mobile, the popular first-person shooter game developed by Activision, has been a …
Read Article
How Many Skins Does Miya Has In Mobile Legends? Mobile Legends is a popular multiplayer online battle arena (MOBA) game that features a wide range of …
Read Article
What Is Api Token Clash Royale? If you are a fan of the popular mobile game Clash Royale, you may have heard of an API token. But what exactly is it? …
Read Article


