Step-by-Step Guide: How to Easily Install an SSD or Hard Drive in Your Gaming PC

post-thumb

How to install an SSD or hard drive in your gaming PC

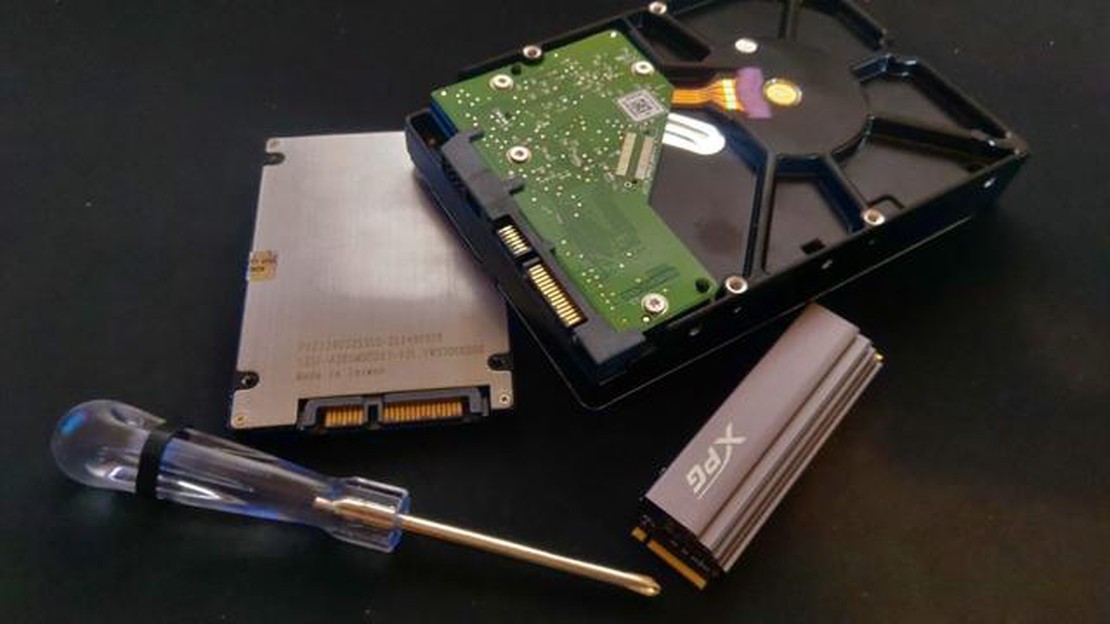
If you’re looking to upgrade your gaming PC’s storage capabilities, installing a solid-state drive (SSD) or additional hard drive is a simple and effective solution. By adding extra storage, you can enhance your gaming experience by having more space for games, faster load times, and improved overall performance. In this step-by-step guide, we will walk you through the process of installing an SSD or hard drive.

Step 1: Choose the right drive

Table Of Contents

Before you begin the installation process, you need to select the right drive for your gaming PC. SSDs are the preferred choice for gamers due to their faster speeds and reliability. However, hard drives offer larger storage capacities at a more affordable price. Consider your needs and budget when making your decision.

Step 2: Prepare your PC

The next step is to prepare your PC for the installation. Shut down your computer and unplug it from the power source. Open the case and locate the storage drive bays. These are typically located near the front of the case and are usually removable. Remove any cables connected to the drive bays and set them aside.

Step 3: Install the drive

Once you have prepared your PC, it’s time to install the drive. Carefully slide the SSD or hard drive into an available drive bay, making sure it is securely inserted. Use the provided screws to tighten the drive in place. If you are installing an SSD, you may need to use an adapter to fit it into a 3.5-inch drive bay.

Step 4: Connect the cables

After securing the drive, connect the necessary cables. For hard drives, use a SATA cable to connect the drive to the motherboard. Additionally, connect a SATA power cable from the power supply to the drive. If you are installing an SSD, you may also need to connect a separate cable for power.

Step 5: Complete the installation

With the drive and cables properly connected, you can now close the case of your gaming PC. Plug in the power cable and turn on the computer. Once your PC is booted up, go to the operating system and open the “Disk Management” tool. Here, you can format and partition your new drive, allowing it to be recognized by the system.

Read Also: Why Can’t I Win In Clash Royale? Common Mistakes and Strategies to Improve

By following these step-by-step instructions, you can easily install an SSD or hard drive in your gaming PC. With the added storage and improved performance, you’ll be able to enjoy a smoother gaming experience. So go ahead, increase your storage capabilities and take your gaming to the next level!

Step-by-Step Guide: How to Easily Install an SSD or Hard Drive in Your Gaming PC

If you want to improve the storage capacity and performance of your gaming PC, installing a solid-state drive (SSD) or an additional hard drive can be a great solution. In this step-by-step guide, we will show you how to easily install an SSD or hard drive in your gaming PC.

  1. Prepare the necessary tools and components: Before you begin, make sure you have the following items:
    • Screwdriver
    • SSD or hard drive
    • SATA cables
    • Power cables
  2. Power off your PC and unplug all cables: Ensure that your gaming PC is completely powered off and disconnected from the power source. This will prevent any accidental damage during the installation process.
  3. Open the PC case: Depending on your PC case model, you may need to remove screws or use a latch to open the case. Refer to the manufacturer’s manual for specific instructions on how to open your PC case.
  4. Locate the storage bays: Look for the existing storage bays in your PC case. These are usually located near the front or bottom of the case. Most storage bays can accommodate multiple drives.
  5. Prepare the SSD or hard drive: If you are installing a new SSD or hard drive, remove it from its packaging and attach any necessary mounting brackets or adapters. Refer to the manufacturer’s instructions for specific details.
  6. Mount the SSD or hard drive: Carefully slide the SSD or hard drive into an available storage bay. Make sure it is firmly seated and secure it with screws if necessary. Ensure that the connectors on the SSD or hard drive align with the corresponding connectors in the storage bay.
  7. Connect the SATA cables: Take a SATA cable and connect one end to the SSD or hard drive. Connect the other end to an available SATA port on your motherboard. Repeat this step for any additional drives you are installing.
  8. Connect the power cables: Take a power cable and connect one end to the SSD or hard drive. Connect the other end to an available power connector from your power supply unit (PSU). Repeat this step for any additional drives you are installing.
  9. Close the PC case: Once all the SSDs and hard drives are installed and properly connected, close the PC case and secure it with screws or latches.
  10. Power on your gaming PC: Connect all the necessary cables to your gaming PC and power it on. The SSDs or hard drives should be detected automatically by your operating system, and you may need to format them before you can use them.

By following these step-by-step instructions, you can easily install an SSD or hard drive in your gaming PC and enjoy increased storage capacity and improved system performance.

Choosing the Right Storage Device

When it comes to choosing the right storage device for your gaming PC, there are two main options to consider: solid-state drives (SSDs) and hard disk drives (HDDs). Each has its own advantages and disadvantages, so it’s important to understand the differences before making a decision.

Read Also: Amos Arch Genshin Impact: How to Obtain, Abilities, and Best Builds

Solid-State Drives (SSDs)

  • Speed: SSDs are known for their fast read and write speeds, which allows for quicker boot times and faster loading times in games.
  • Reliability: Since SSDs have no moving parts, they are generally more reliable and durable compared to HDDs.
  • Noise: SSDs produce no noise since they do not have spinning disks like HDDs, making them ideal for those who prefer a quieter gaming experience.
  • Capacity: SSDs tend to have smaller storage capacities compared to HDDs, which can be a limitation for gamers who require a lot of storage space for their games.
  • Price: SSDs are generally more expensive than HDDs, especially when it comes to higher capacities.

Hard Disk Drives (HDDs)

  • Storage Capacity: HDDs are known for their large storage capacities, making them a good choice for gamers who have extensive gaming libraries.
  • Price: HDDs are generally more affordable compared to SSDs, especially when it comes to higher capacities.
  • Noise: HDDs can produce noise due to the spinning disks and moving parts, which may not be ideal for those who prefer a quieter gaming experience.
  • Speed: HDDs are slower compared to SSDs when it comes to read and write speeds, which can result in longer boot times and slower loading times in games.
  • Reliability: HDDs are more prone to failure and data loss due to their moving parts, making them less reliable compared to SSDs.

Ultimately, the choice between an SSD and HDD will depend on your specific needs and budget. If you prioritize speed, reliability, and noiselessness, then an SSD may be the best option for you. However, if you require a large storage capacity at an affordable price, and don’t mind the noise and slower speeds, then an HDD may be more suitable.

Preparing Your Gaming PC

Before you can install a new SSD or hard drive in your gaming PC, there are a few steps you need to take to ensure a smooth installation process. Follow these steps to prepare your gaming PC:

  1. Back up your data: Before making any changes to your computer’s storage, it’s important to back up any important data or files. This will ensure that you don’t lose any valuable information during the installation process.
  2. Power off your PC: Shut down your gaming PC and disconnect it from the power source. It’s important to work on your computer in a safe and powered-off state to avoid any potential electric shocks or damage to your hardware.
  3. Gather the necessary tools: Before starting the installation, make sure you have all the necessary tools on hand. You will typically need a screwdriver, SATA cables (if they don’t come with the SSD or hard drive), and an adapter bracket (if required to fit the drive into the bay).
  4. Identify an available storage bay: Depending on the size of your case and the number of existing drives, identify an available bay to install your new SSD or hard drive. This may require removing a pre-existing drive or using an empty slot.
  5. Remove the side panel of your PC case: Use a screwdriver to remove the screws securing the side panel of your PC case. This will grant you access to the internal components of your computer.
  6. Ground yourself: Before touching any internal components, it’s important to ground yourself to prevent any damage from static electricity. You can ground yourself by touching a metal object or wearing an anti-static wristband.
  7. Locate the SATA ports on your motherboard: Look for the SATA ports on your motherboard where you will connect the SSD or hard drive. Typically, these ports are labeled and can be found near the corners of the board.
  8. Mount the SSD or hard drive: Depending on the type of drive and your case, you may need to use an adapter bracket to mount the SSD or hard drive securely into the storage bay. Follow the manufacturer’s instructions for proper mounting.
  9. Connect the SATA and power cables: Connect one end of the SATA cable to the SSD or hard drive and the other end to an available SATA port on your motherboard. Additionally, connect the power cable to the corresponding power connector on the drive.
  10. Replace the side panel: Once the SSD or hard drive is securely installed and connected, replace the side panel of your PC case and fasten the screws to secure it in place.
  11. Reconnect the power and boot up your PC: Plug your gaming PC back into the power source and power it on. Check the BIOS settings to ensure the new SSD or hard drive is detected and recognized. If everything is working properly, you’re ready to proceed with formatting and configuring the new storage device.

By following these steps, you will be well-prepared to install a new SSD or hard drive in your gaming PC. This will allow you to expand your storage capacity and improve the performance of your gaming rig.

Installing the SSD or Hard Drive

Once you have chosen the SSD or hard drive that you want to install in your gaming PC, follow these step-by-step instructions to successfully install it:

  1. Power off your gaming PC and unplug it from the power source.
  2. Open the PC case by removing the screws holding the side panel in place.
  3. Locate an available drive bay in your PC case. Typically, these drive bays are located at the front or bottom of the case.
  4. If necessary, remove the existing drive bracket from the drive bay. This might involve unscrewing it or sliding it out, depending on the design of your case.
  5. Take the SSD or hard drive and carefully insert it into the empty drive bay. Ensure that the connectors on the drive are facing towards the back of the case.
  6. Attach the drive to the drive bay using the screws provided with the drive or the case. Tighten the screws until the drive is securely in place.
  7. If you are installing an SSD, you will need to find an available SATA power connector from the power supply and connect it to the SSD. If you are installing a hard drive, you will also need to connect a SATA data cable to the drive.
  8. If necessary, connect the other end of the SATA data cable to an available SATA port on the motherboard.
  9. Double-check that all connections are secure and then close the PC case by reattaching the side panel and tightening the screws.
  10. Plug the gaming PC back into the power source and power it on.
  11. Once your PC is powered on, check the BIOS or operating system to ensure that the SSD or hard drive is detected. If it is not detected, you may need to check the connections or consult the manufacturer’s instructions.
  12. You can now begin using the newly installed SSD or hard drive to store and access your gaming files and data.

Remember to follow all safety precautions and consult your gaming PC’s manual or the manufacturer’s instructions for any specific installation steps or requirements.

FAQ:

Why would I want to install an SSD or hard drive in my gaming PC?

Installing an SSD or hard drive in your gaming PC allows you to easily expand your storage capacity. This is especially important if you have a large collection of games or if you work with large files, such as video editing or 3D modeling. Additionally, an SSD can greatly improve the performance of your PC, as it provides faster data transfer speeds compared to a traditional hard drive.

What is the difference between an SSD and a hard drive?

An SSD (Solid State Drive) is a type of storage device that uses flash memory to store data, while a hard drive uses spinning magnetic platters. The main difference between the two is their speed - SSDs are significantly faster, as they have no moving parts, while hard drives are slower due to their mechanical nature. SSDs also tend to be more reliable and durable, but they are generally more expensive per gigabyte of storage compared to hard drives.

What tools do I need to install an SSD or hard drive in my gaming PC?

To install an SSD or hard drive in your gaming PC, you will need a screwdriver, SATA cables, and possibly a mounting bracket, depending on your case. You may also need an external enclosure if you are planning to clone your existing hard drive to the new SSD. It’s a good idea to consult the user manual of your specific case and motherboard to ensure you have all the necessary tools and accessories.

Can I install multiple SSDs or hard drives in my gaming PC?

Yes, you can install multiple SSDs or hard drives in your gaming PC. Most gaming cases come with multiple drive bays, allowing you to easily expand your storage capacity. To install multiple drives, simply follow the same steps mentioned earlier for each additional drive. Keep in mind that your motherboard and power supply should have enough SATA ports and power connections to accommodate the extra drives.

See Also:

comments powered by Disqus

You May Also Like