


Step-by-Step Guide on How to Tame a Wolf in Minecraft | Minecraft Taming Tips
How To Tame Wolf In Minecraft? Are you a Minecraft player looking to add a loyal companion to your adventures? Taming a wolf in Minecraft can be a …
Read Article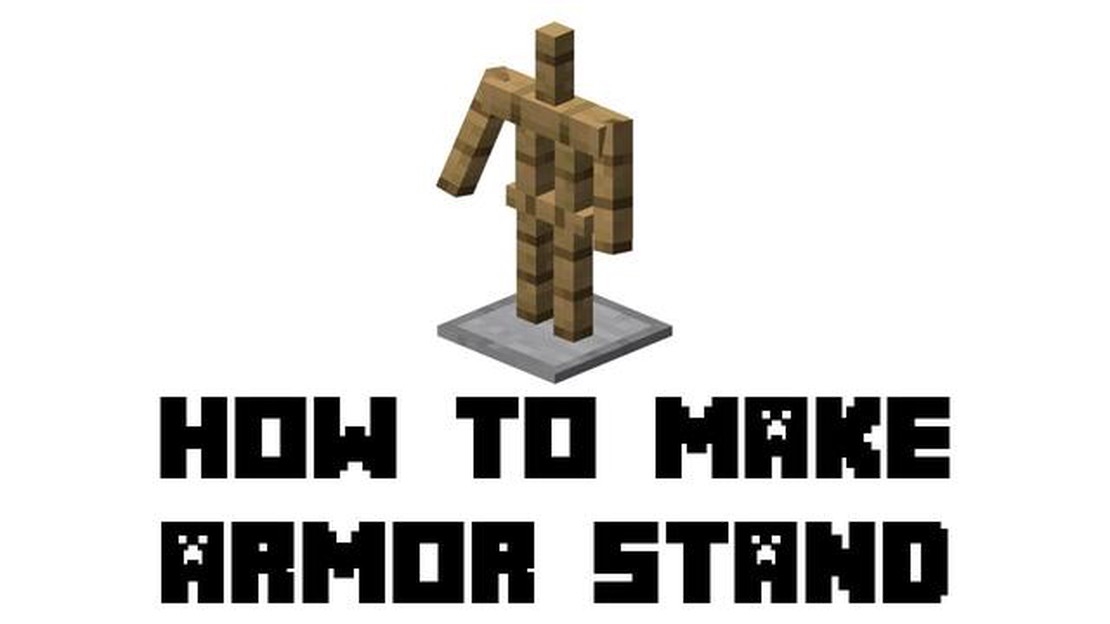
Minecraft is a popular sandbox game that allows players to build and create their own virtual worlds. One of the many features of Minecraft is the ability to make an armor stand, which allows players to display and store their armor and weapons in a stylish and organized way. Whether you’re a beginner or an expert player, learning how to make an armor stand in Minecraft is an essential skill to have.
Creating an armor stand in Minecraft is a simple process that requires a few basic materials and some crafting knowledge. First, gather the necessary materials, which include six sticks and one smooth stone slab. These materials can be found easily within the game by mining or trading with villagers.
Once you have the materials, open your crafting table and arrange them in the following pattern: place three sticks in the bottom row, one stick in the middle square of the middle row, and two sticks on either side of the middle square in the top row. Finally, place the smooth stone slab in the center square of the middle row. Once you have arranged the materials in this pattern, you will have successfully crafted an armor stand.
Now that you have your armor stand, you can place it anywhere in your Minecraft world. Simply right-click on the ground where you want to place it, and the armor stand will appear. To fully utilize the armor stand, you can add armor and weapons to it by right-clicking on the stand while holding the item you want to add. The armor or weapon will then be displayed on the stand, allowing you to easily access and store your items.
Learning how to make an armor stand in Minecraft is a valuable skill that will enhance your gameplay experience. Not only will it allow you to display your armor and weapons in a neat and organized way, but it will also help you keep track of your items and easily access them whenever you need them. So go ahead and start crafting your own armor stand in Minecraft today!
In Minecraft, an armor stand is a useful item that allows players to display their armor and other items in a decorative way. Here’s how you can make an armor stand in Minecraft:
Once you have the armor stand in your inventory, you can place it in your Minecraft world by right-clicking on the ground. The armor stand will appear, and you can interact with it by right-clicking on it.
To display armor or other items on the stand, simply right-click on the stand and select the “Open” option. Then, drag the desired items from your inventory onto the armor stand’s slots. The items will now be displayed on the armor stand.
You can also customize the armor stand’s pose by right-clicking on it and selecting the “Pose” option. This allows you to rotate and position the armor stand’s arms, legs, and head in different ways.
Overall, armor stands are a great addition to Minecraft for players who want to showcase their armor and items in a decorative and organized manner. They can be a fun and creative way to personalize your Minecraft world.
To create an armor stand in Minecraft, you will need the following materials:
Sticks: You can obtain sticks by harvesting tree branches or by crafting them from wooden planks. To craft sticks, place two wooden planks vertically in the crafting table, yielding four sticks.
Read Also: Step-by-Step Guide: How to Create a Game in Roblox | Complete Tutorial
Stone slab: A stone slab can be crafted by placing three stone blocks in a horizontal row in the crafting table, yielding six stone slabs.
Once you have gathered these materials, you are ready to proceed to the next step in creating an armor stand in Minecraft.
Now that you have gathered all the necessary materials, it’s time to craft the armor stand. Follow the steps below:
| Stick | ||
|---|---|---|
| Stick | Stone Slab | Stick |
| Stick |
Once you have placed the items in the grid as shown above, the armor stand will appear in the result box.
Note: The placement of items in the crafting grid is important, so make sure to arrange them exactly as mentioned above.
Read Also: How to Disable League of Legends Mobile: Step-by-Step Guide
That’s it! You have successfully crafted an armor stand in Minecraft. Now you can use the armor stand to display and store your armor or create unique and decorative setups in your world.
Now that you’ve crafted your armor stand, it’s time to place it in your Minecraft world and customize its appearance.
To place the armor stand, go to the desired location in your world and right-click on the ground. The armor stand will be placed in that spot.
Once the armor stand is placed, you can start customizing its appearance. To do this, right-click on the armor stand to open its options menu.
Here are some of the customization options available:
Additionally, you can customize the armor and items displayed on the armor stand by equipping them onto it. Simply hold the desired item in your hand and right-click on the armor stand to equip it.
Take some time to experiment with the different customization options and see what suits your needs. You can create unique displays and scenes using armor stands and items.
Once you’re satisfied with the appearance of your armor stand, you can move on to the next step in your Minecraft adventure!
To make an armor stand in Minecraft, you will need six sticks and one smooth stone slab. First, open your crafting table and arrange the sticks in the shape of a “T”. Then, place the smooth stone slab on top of the middle stick. Once you have crafted the armor stand, you can place it in the world by right-clicking on a block.
An armor stand in Minecraft has various uses. You can use it to display and store armor, as a decorative item in your builds, or as a tool for organizing and showcasing your items. You can also customize the armor stand by equipping it with different types of armor, add decorative items like banners, or even give it arms and poses using commands.
To remove an armor stand in Minecraft, simply attack it. You can use any weapon or your bare hands to break the armor stand. Once broken, it will drop as an item that you can pick up. Alternatively, if you want to remove multiple armor stands at once, you can use the /kill command followed by @e[type=minecraft:armor_stand] in the chat or command block.
How To Tame Wolf In Minecraft? Are you a Minecraft player looking to add a loyal companion to your adventures? Taming a wolf in Minecraft can be a …
Read Article
Swordsman Oni Genshin Impact Unleash the Power of Oni in This Exciting New Character, Swordsman Oni Genshin Impact! Introducing Swordsman Oni Genshin …
Read Article
The best horror games in 2023 Horror games have become increasingly popular in recent years, providing gamers with heart-pounding thrills and …
Read Article
How To Change Your Color In Among Us? Among Us is a popular online multiplayer game that has taken the gaming world by storm. In this game, players …
Read Article
How To Get Free Gems On Clash Of Clans? Are you tired of spending your hard-earned money on Clash of Clans gems? Look no further! We have compiled a …
Read Article
Where Is The Final Ruin Genshin Impact? Genshin Impact is an action role-playing game developed by miHoYo, and it has captivated players with its …
Read Article


