


How to Get the Onion Cricket in Animal Crossing – Tips and Tricks
How to Get the Onion Cricket in Animal Crossing If you’re an avid player of Animal Crossing, you may have come across the elusive Onion Cricket. This …
Read Article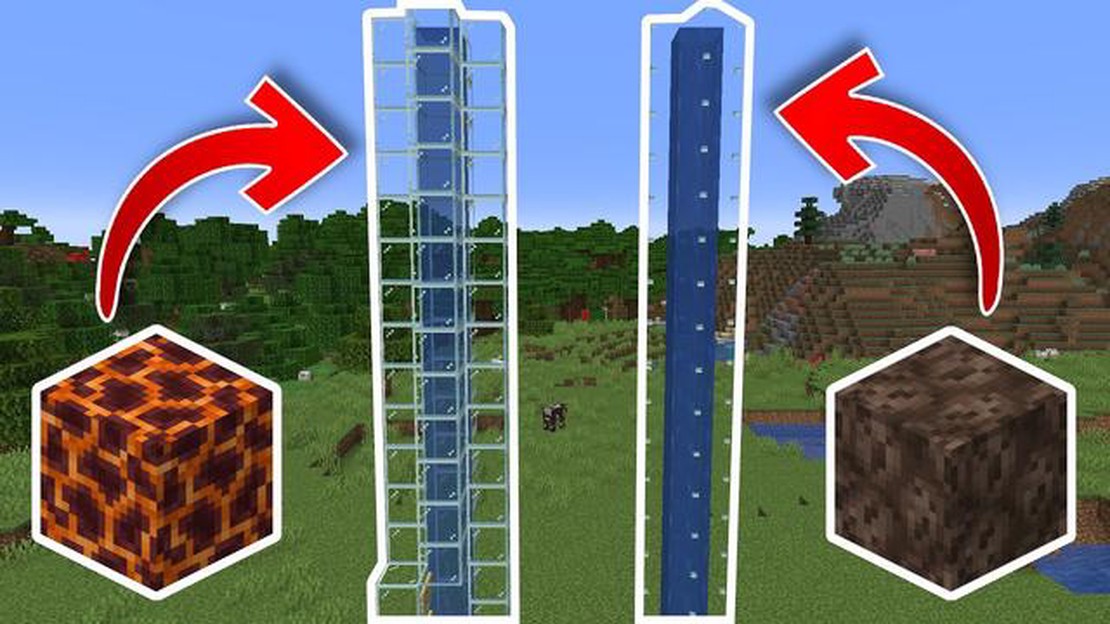
Minecraft is a popular sandbox game that allows players to build and explore virtual worlds. One of the many exciting features of Minecraft is the ability to create complex redstone contraptions, including elevators. In this step-by-step guide, we will walk you through the process of building a bubble elevator in Minecraft, which will allow you to quickly and effortlessly travel vertically in the game.
To build a bubble elevator, you will need a few key materials. First, you will need water source blocks, which can be easily obtained by placing buckets of water in a suitable location. You will also need signs, which can be crafted using wooden planks. Finally, you will need a soul sand block, which can be found in the Nether dimension.
The first step in building a bubble elevator is to create a vertical shaft. This can be done by digging a hole that is at least three blocks deep. Once you have the shaft, you will need to fill it with water source blocks. Place the water source blocks at the bottom of the shaft and let the water flow upwards to fill the entire shaft.
Next, you will need to add the soul sand block at the bottom of the shaft. The soul sand block will create bubble columns when water is flowing over it, allowing you to travel vertically. To do this, simply place the soul sand block at the bottom of the shaft, and the bubbles will start to appear.
Finally, you will need to add signs to the sides of the shaft to prevent the water from flowing out. Place signs on each wall of the shaft, starting from the top and going all the way down to the bottom. The signs will act as barriers, allowing the water to flow freely within the shaft but preventing it from spilling out.
Once you have completed these steps, your bubble elevator should be ready to use. Simply stand in the water and let the bubbles carry you upwards. To descend, simply press the shift key to sink down. With your new bubble elevator, you will be able to navigate your Minecraft world with ease!
Note: It is important to note that bubble elevators only work in water and will not function in any other type of liquid. Additionally, bubble elevators cannot be used in Creative mode, as the ability to swim upwards is disabled. Keep these limitations in mind when building and using your elevator.
Minecraft offers players a unique sandbox experience where they can build and create anything their imagination desires. One popular feature in the game is the bubble elevator, which allows players to quickly ascend or descend in water using the bubble columns mechanic.
If you want to build a bubble elevator in Minecraft, follow the step-by-step guide below:
Read Also: The Ultimate Elden Ring Staff Guide for Sorcerers: Find the Best One for You11. Place soul sand: 12. On the inside of the tower, replace the bottom block with a soul sand block. Soul sand creates the bubble columns that propel players upwards. 13. Test the elevator:
14. Jump into the water at the bottom of the tower and see if the bubble column carries you upwards. If not, make sure the soul sand block is placed correctly and the water source is covering it entirely. 15. Optional: Decorate the elevator: 16. You can add windows, signs, or other decorative elements to your elevator to make it visually appealing.
And there you have it! You have successfully built a bubble elevator in Minecraft. Enjoy using this convenient transportation method in your world and explore the endless possibilities of the game!
Read Also: When Is the New Season of Fortnite? Find Out Here
To start building a bubble elevator in Minecraft, you will need to gather the following materials:
Once you have gathered all the necessary materials, you are ready to move on to the next step.
Once you have gathered all the necessary materials, you can start building the base of your bubble elevator. Follow these steps:
Once you have completed these steps, your base for the bubble elevator will be ready. You can now proceed to the next step of the building process.
Now that you have built the elevator shaft, it’s time to add the water and soul sand to make the elevator function properly.
Here is what you need to do:
And that’s it! You have successfully added the water and soul sand to your bubble elevator. Now you can test it out by standing on the soul sand and watching as the bubbles carry you to the top of the shaft.
Remember to be careful when using the elevator, as it can be a bit tricky to navigate at first. Practice using it a few times to get the hang of it before relying on it for regular transportation in your Minecraft world.
To build a bubble elevator in Minecraft, you need to create a column of water blocks. At the bottom of the column, you can place a magma block or a soul sand block to create the bubbles. To start, dig a hole to the desired depth for your elevator. Then, fill the hole with water to create a water source block. Finally, place either a magma block or a soul sand block at the bottom of the column to create the bubbles.
Both magma blocks and soul sand blocks can be used to create bubbles in a bubble elevator, but they have different effects. Magma blocks create downward bubbles, which can be used to create an elevator that pulls players or mobs down. Soul sand blocks, on the other hand, create upward bubbles, which can be used to create an elevator that pushes players or mobs up.
Bubble elevators work in most versions of Minecraft, including the Java Edition, Bedrock Edition, and Legacy Console Edition. However, some older versions of the game may not have the necessary blocks or mechanics to create a bubble elevator.
No, bubble elevators can only be used to transport players or mobs in Minecraft. They cannot be used to transport items. If you need to transport items vertically, you can use water currents, hoppers, or other mechanism.
Yes, it is possible to make a multi-floor bubble elevator in Minecraft. To create a multi-floor elevator, you can simply extend the column of water and add more bubble blocks at different levels. Players can then enter the elevator at different heights and be transported to the desired floor.
If you fall into a bubble elevator without armor, you will take fall damage when you hit the ground. To avoid taking damage, you can either wear armor, use a slow falling potion, or place water at the bottom of the elevator to break your fall.
Yes, you can build a bubble elevator in creative mode in the same way as in survival mode. Creative mode gives you unlimited resources, making it easier to build and experiment with different elevator designs.
How to Get the Onion Cricket in Animal Crossing If you’re an avid player of Animal Crossing, you may have come across the elusive Onion Cricket. This …
Read Article
How To Change Brawl Stars Picture? In the popular mobile game Brawl Stars, having a cool and unique profile picture can help you stand out from the …
Read Article
What Is Pokemon Home? Pokemon Home is the latest addition to the Pokemon franchise, and it is revolutionizing the way Pokemon trainers collect, trade, …
Read Article
Who Is Like Miss Fortune In Mobile Legends? Are you looking to dominate the battlefield as Miss Fortune in Mobile Legends? Look no further! Our …
Read Article
How To Buy Minecraft? If you’ve ever wanted to explore the vast world of Minecraft, now is the perfect time to jump in and start building your dream …
Read Article
Where Is Apex Legends Mobile Available? Apex Legends Mobile, the highly anticipated mobile version of the popular battle royale game, has finally been …
Read Article


