

Step-by-step Guide: How to Install Apex Legends on Mobile
How To Install Apex Legends On Mobile? Apex Legends has taken the gaming world by storm with its thrilling gameplay, intense battles, and fast-paced …
Read Article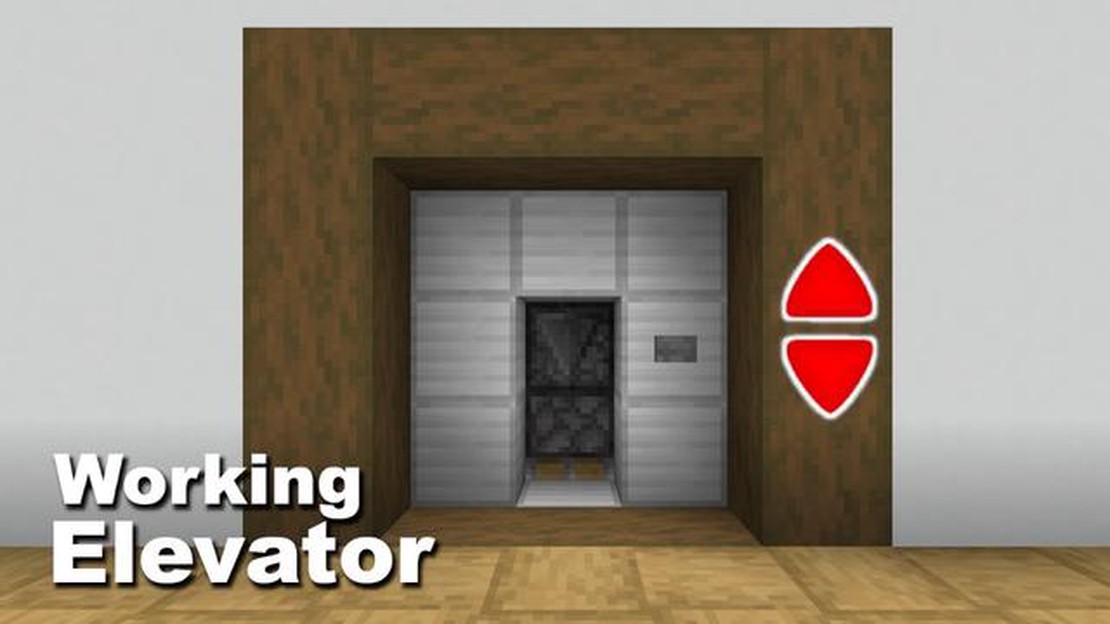
Minecraft is a popular sandbox game that allows players to build and explore virtual worlds. One of the most impressive creations players can make in Minecraft is an elevator. An elevator is a vertical transportation device that allows players to move quickly and efficiently between different levels of their builds. In this step-by-step guide, we will walk you through the process of creating a functional elevator in Minecraft.
To start, you will need a few basic materials: redstone dust, redstone torches, sticky pistons, blocks of your choice, and a button or lever. Redstone is a special material in Minecraft that allows players to create complex mechanisms and circuits. You will also need some open space to build your elevator shaft.
The first step in building your elevator is to create the elevator shaft. Decide how tall you want your elevator to be and dig a hole that is one block wider and longer than your desired elevator size. Next, stack blocks vertically to create the walls of the shaft. Make sure to leave a space in the center where the elevator will travel. You can make your elevator as tall as you like, but keep in mind that you will need more materials and redstone circuits for taller elevators.
Once you have your shaft built, it’s time to start placing the redstone circuits. Start by placing a sticky piston on the floor of the lowest level of your shaft. Then, place a block on top of the piston. This block will serve as the platform of the elevator. Next, place a redstone torch on the side of the block next to the piston. This will power the piston and make it extend or retract when activated.
At the top of your elevator shaft, place another sticky piston facing downward. Attach a block to the bottom of this piston. This block will serve as the ceiling of the elevator. Now, connect the redstone dust from the torch on the lowest level to the torch on the upper level using blocks or redstone dust on the walls of your shaft.
In Minecraft, elevators are a popular feature that players often incorporate into their builds. Elevators provide a quick and convenient way to transport between different floors or levels within a structure, saving time and effort. Understanding the concept of Minecraft elevators involves learning the mechanics behind their functionality and the different design options available.
Minecraft elevators are typically based on redstone mechanics, a power system that allows players to create complex contraptions and automate various tasks. Redstone torches, repeaters, comparators, and other components are used to transmit and control redstone power.
Elevators can be built using various designs, including piston-based or water-based systems. Piston-based elevators use sticky pistons to push or pull blocks in order to create a moving platform. Water-based elevators utilize water streams and soul sand or magma blocks to create upward or downward movement for the player.
Players have a range of design options when it comes to Minecraft elevators. They can choose between vertical or horizontal designs based on the desired direction of movement. Vertical elevators move the player straight up or down, while horizontal elevators provide horizontal transportation.
Some popular designs include:
Minecraft elevators offer several benefits and applications in gameplay. They save time and effort by providing a quick means of transportation between different levels of a structure or a base. They can also add functionality and convenience to large-scale projects, such as skyscrapers, underground complexes, or themed builds.
Players can get creative with their elevator designs, incorporating different aesthetic elements and redstone mechanisms to make their elevator stand out. Elevators can also be combined with other features, such as hidden entrances or secret rooms, to add an extra layer of intrigue to the structure.
Understanding the concept of Minecraft elevators involves grasping the mechanics behind their functionality and exploring the different design options available. Whether you choose a piston-based or water-based design, elevators can add convenience, efficiency, and creativity to your Minecraft builds. Experiment with different designs and elevate your gameplay experience!
In Minecraft, elevators are an essential feature that can greatly enhance gameplay and improve efficiency. Here are some of the key reasons why using elevators in Minecraft is important:
Overall, the use of elevators in Minecraft brings numerous benefits, ranging from enhanced convenience and time-saving to improved aesthetics and efficient transportation. Incorporating elevators into your Minecraft builds can greatly enhance your gaming experience and make your structures more functional and visually appealing.
Building an elevator in Minecraft can be a fun and useful addition to your world. With a basic elevator, you can easily transport yourself and items between different floors of your buildings. In this step-by-step guide, you’ll learn how to create a simple elevator using redstone and blocks.
Materials Needed:
Step 1: Choose Elevator Style
Read Also: How To Buy Turnips in Animal Crossing: A Comprehensive Guide
The first step in building an elevator is to decide on the style and design you want. You can choose between a vertical elevator that goes straight up and down or a horizontal elevator that moves horizontally between different floors. For this guide, we will focus on a vertical elevator.
Step 2: Select Elevator Shaft Location
Next, you’ll need to select the location for your elevator shaft. This can be inside a building or even outside. Make sure you have enough space for the elevator to move freely without any obstructions.
Step 3: Build Redstone Wiring
Read Also: How to Find and Use Coordinates in Minecraft: A Step-by-Step Guide
Using your stone blocks, build a vertical shaft that will serve as the path for your elevator. Leave enough room inside the shaft for your character to stand and move around. Once the shaft is built, place redstone dust on the floor of each level.
Step 4: Install Redstone Torches
To activate the elevator, you’ll need to install redstone torches on the side wall of each level in the shaft. Place a torch on one side of the shaft at each level, ensuring that they are all connected.
Step 5: Add Buttons
Finally, place buttons on the wall next to each level to allow players to call the elevator. When a button is pressed, the redstone circuit will activate and power the redstone torches, causing the elevator to move up or down to the desired level.
Step 6: Test and Fine-tune
Once your elevator is built, test it out to make sure it’s functioning correctly. If you find any issues, you may need to adjust the redstone wiring or button placements to fix them.
Congratulations! You have successfully built a basic elevator in Minecraft. Now you can easily move between different floors of your buildings without the hassle of staircases. Feel free to customize and expand upon this design to create even more complex elevators.
Before you can start building an elevator in Minecraft, you will need to gather the following materials:
Once you have gathered all these materials, you’ll be ready to move on to the next step of building your elevator in Minecraft.
Once you have gathered all the necessary materials, it’s time to start constructing the elevator shaft. Here are the steps to follow:
Once you have completed these steps, you will have successfully constructed the elevator shaft for your Minecraft elevator. In the next step, we will focus on creating the mechanics that will make your elevator functional.
To make an elevator in Minecraft, you will need the following materials:
No, redstone is a crucial component for creating a functional elevator in Minecraft. It is used to power and control the movement of the elevator platform.
In Minecraft, you can make an elevator as high as you want. The height limit is 256 blocks, so you can build an elevator that spans from the lowest level of your world to the highest level.
Yes, it is possible to make a water elevator in Minecraft. To create one, you will need to build a shaft using water source blocks and signs or soul sand. The player can then swim upwards in the water elevator to reach higher levels.
Yes, you can make a piston elevator in Minecraft. Piston elevators use the movement of pistons to transport players vertically. This type of elevator is more advanced and requires additional redstone knowledge and resources.
How To Install Apex Legends On Mobile? Apex Legends has taken the gaming world by storm with its thrilling gameplay, intense battles, and fast-paced …
Read Article
How to master fishing in Stardew Valley without floundering Fishing is one of the most enjoyable and challenging activities in the popular farming …
Read Article
How To Make Almond Tofu Genshin Impact? Genshin Impact is a popular action role-playing game that offers a wide range of activities for players to …
Read Article
Best gaming mouse in 2023 Are you a passionate gamer looking for the perfect gaming mouse to enhance your gaming experience in 2023? Look no further! …
Read Article
How to Make a Bunker in Minecraft Are you tired of constantly being exposed to the dangers of the Minecraft world? Do you want a safe haven where you …
Read Article
How to get the best Sandevistans in Cyberpunk 2077 In the dystopian future of Cyberpunk 2077, finding the right equipment can mean the difference …
Read Article


