


The Ultimate Guide to Finding the Best Clash of Clans Base
What Is The Best Clash Of Clans Base? Clash of Clans is a popular mobile strategy game where players build their own villages and battle against other …
Read Article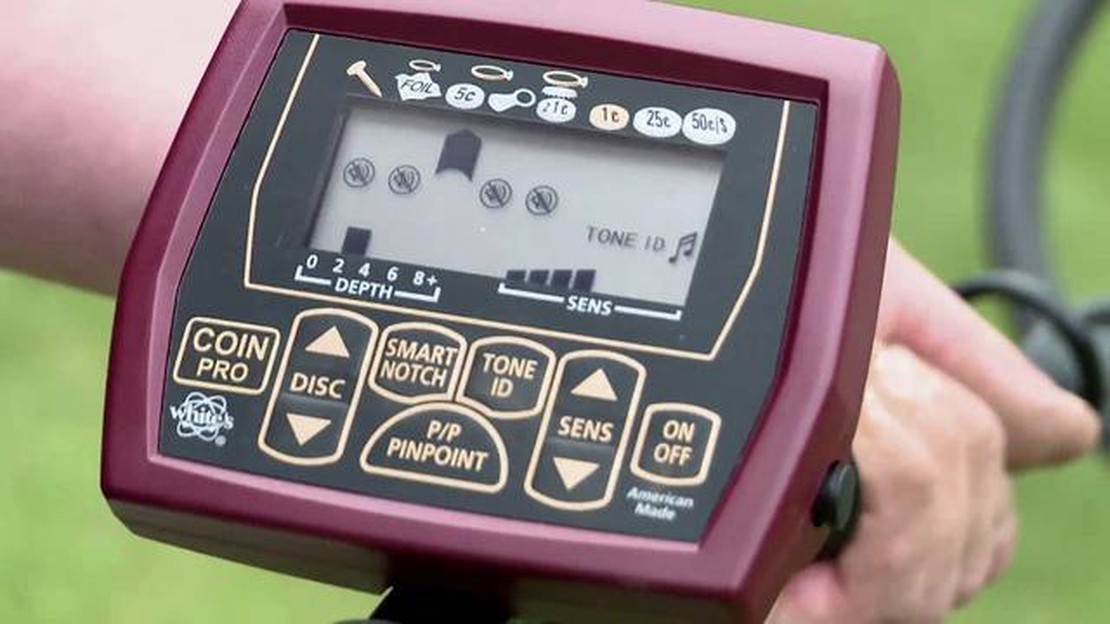
If you’re new to metal detecting or just got your hands on a Whites Coin Master Pro metal detector, you may be wondering how to properly operate this advanced device to ensure successful treasure hunting. Don’t worry! In this step-by-step guide, we will walk you through the process of operating a Whites Coin Master Pro, from setting it up to understanding its features and using it effectively in the field.
First and foremost, it’s important to familiarize yourself with the Whites Coin Master Pro’s control panel. This metal detector features a user-friendly interface with clearly labeled buttons and knobs. The power button, sensitivity control, discrimination control, and pinpoint mode are some of the key features you need to understand.
Next, you’ll want to set up your Whites Coin Master Pro properly. Begin by installing the batteries and adjusting the shaft to a comfortable length. Once the detector is assembled, you can proceed to calibrate it for optimal performance. This involves adjusting the sensitivity and discrimination settings to match the specific environment and your treasure hunting goals.
Once the Whites Coin Master Pro is set up, it’s time to start using it in the field. Begin by selecting an area with good potential for finding treasures. Sweep the search coil over the ground in a slow and systematic manner, keeping it parallel to the surface. Pay attention to any signals or beeps emitted by the metal detector, as they indicate the presence of metal objects beneath the ground.
Remember to swing the detector’s coil from different angles and depths to ensure thorough coverage of the area. Additionally, using the pinpoint mode can help you accurately locate the target. Once a potential target is detected, use the discrimination control to filter out undesirable objects and focus on valuable finds.
By following these step-by-step instructions, you’ll be able to operate your Whites Coin Master Pro metal detector with confidence and increase your chances of finding exciting treasures. With practice and experience, you’ll become more proficient in identifying different types of targets and maximizing the performance of your metal detector. So, get out there and start discovering the hidden treasures waiting to be found!
Operating a Whites Coin Master Pro Metal Detector is a straightforward process. By following these simple steps, you’ll be able to maximize the potential of your metal detector and improve your chances of finding valuable coins.
Read Also: Mastering the Art of Using Cyclops in Mobile Legends: A Comprehensive Guide | [Website Name]
By following these step-by-step instructions, you will be able to operate your Whites Coin Master Pro Metal Detector effectively and increase your chances of finding valuable coins. Remember to always follow local laws and obtain permission before conducting metal detecting activities in public or private areas.
Before you start using your Whites Coin Master Pro metal detector, you need to make sure it is properly set up. Follow these steps to ensure a successful metal detecting experience:
Read Also: Safe Tips for Buying a Clash of Clans Account
Once you have completed these steps, your Whites Coin Master Pro metal detector should be ready to use. Familiarize yourself with the different audio and visual signals it provides to identify different types of metal targets. Happy metal detecting!
Operating the Whites Coin Master Pro Metal Detector is a straightforward process that can be easily mastered with a little practice. This section will guide you through the steps needed to use your metal detector effectively.
To begin, locate the power switch on your metal detector. It is usually located near the control panel. Flip the switch to the “On” position to power on the device. The control panel should light up, indicating that the metal detector is now turned on.
The next step is to adjust the sensitivity level of your Whites Coin Master Pro Metal Detector. The sensitivity controls how deeply the detector can detect metal objects. Use the sensitivity knob or buttons on the control panel to increase or decrease the sensitivity level based on your preference and the conditions you are detecting in. Experiment with different settings to find the optimal sensitivity level for your metal detecting needs.
The Whites Coin Master Pro Metal Detector offers different search modes to help you target specific types of objects. Choose the search mode that best suits your metal detecting goals. Common search modes include All Metal, Discrimination, and Pinpoint. Read the user manual for detailed information about each search mode and their applications.
Ground balancing is an important step in using the Whites Coin Master Pro Metal Detector, as it helps minimize false signals caused by mineralized soil or interference. Follow the manufacturer’s instructions for properly ground balancing your metal detector. This may involve pressing a ground balance button and adjusting the ground balance control until the device is properly balanced for the soil conditions in your area.
Now that your Whites Coin Master Pro Metal Detector is ready, it’s time to start searching! Hold the metal detector with one hand on the grip and the coil parallel to the ground. Begin sweeping the metal detector from side to side in a slow and controlled motion while walking forward. Overlap each sweep to ensure no areas are missed.
When the metal detector detects a target, it will emit a signal, usually in the form of a tone or a visual indicator on the control panel. Take note of the type of signal and use it to determine if the target is worth digging for. Different metals will produce different signals, so it’s important to learn how to interpret these signals correctly through practice and experience.
When you decide to dig for a target, use a small shovel or a handheld digger to carefully excavate the area. Take care not to damage the target or surrounding area during the digging process. Once you have recovered the target, inspect it to determine if it is something of value or interest. Fill in the hole and leave the area as you found it.
Remember to follow local laws and regulations regarding metal detecting and always respect private property rights. Happy metal detecting!
The Whites Coin Master Pro is a metal detector designed to find coins, jewelry, and other valuable metal objects.
Yes, the Whites Coin Master Pro is a great choice for beginners. It is easy to use and has a simple interface.
The Whites Coin Master Pro uses two 9-volt batteries.
No, the Whites Coin Master Pro is not designed for use underwater. It is only waterproof up to the control housing.
The Whites Coin Master Pro can detect coins up to a depth of around 8 inches, depending on the size and composition of the coin.
What Is The Best Clash Of Clans Base? Clash of Clans is a popular mobile strategy game where players build their own villages and battle against other …
Read Article
Pokemon Go What Lies Beneath The Mask? Since its release in 2016, Pokemon Go has taken the world by storm, captivating millions of players and …
Read Article
How Many Village In Coin Master? Coin Master is a popular mobile game that has taken the gaming world by storm. It combines elements of strategy, …
Read Article
How To Get Clash Of Clans Hack? Are you tired of grinding for hours just to progress in Clash of Clans? Do you want to upgrade your defenses and …
Read Article
The best gaming TV in 2023 Gaming has become a popular form of entertainment, and players are constantly seeking the best equipment to enhance their …
Read Article
How Do You Turn Coin Master Coins Into Cash? Have you been playing Coin Master and accumulating a large number of coins? Are you wondering how to turn …
Read Article


