


How to Get Free Gems in Clash of Clans: Top Methods and Tips
How To Get A Lot Of Gems In Clash Of Clans For Free? Are you tired of spending your hard-earned money on Clash of Clans gems? Well, we have good news …
Read Article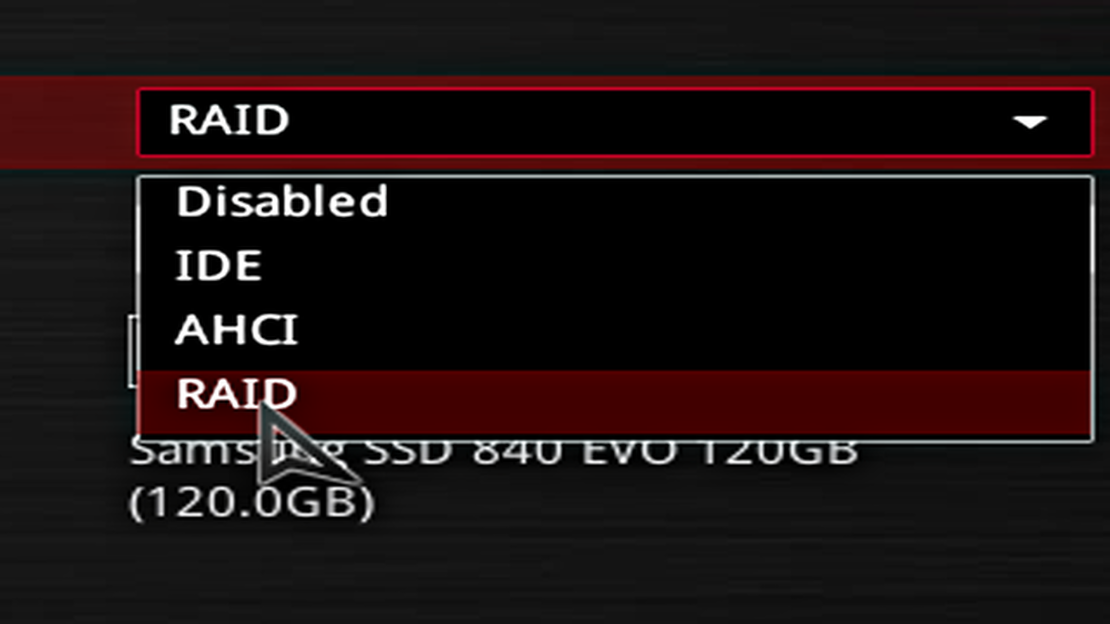
RAID 1, also known as mirroring, is a popular data storage technology that provides redundancy and data protection. By setting up RAID 1, you can ensure that your data is safe even if one of your hard drives fails. This step-by-step guide will walk you through the process of setting up RAID 1 on both Windows and Linux operating systems.
Step 1: Check hardware compatibility
Before setting up RAID 1, it’s important to ensure that your hardware supports this feature. You will need at least two hard drives of the same size and type, and a compatible RAID controller or motherboard with RAID capabilities. Check the documentation or manufacturer’s website to confirm compatibility.
Step 2: Backup your data
Setting up RAID 1 involves initializing and formatting the hard drives, which will erase all existing data. Therefore, it is crucial to backup your data before proceeding. Copy all important files and folders to an external storage device or cloud storage solution to prevent data loss.
Step 3: Enter RAID configuration utility
To configure RAID 1, you need to access the RAID configuration utility, which is typically accessible during the computer’s boot process. The specific key or combination of keys may vary depending on your motherboard or RAID controller. Consult the user manual or manufacturer’s website to find out how to enter the RAID configuration utility.
Step 4: Create RAID 1 array
Once you are in the RAID configuration utility, you will need to create a RAID 1 array. This involves selecting the hard drives you want to use in the mirror and configuring the RAID level to RAID 1. Follow the on-screen instructions or refer to the documentation for your specific RAID configuration utility for detailed steps.
Step 5: Initialize and format the RAID array
After creating the RAID 1 array, you will need to initialize and format it before it can be used. This process will prepare the hard drives for data storage and overwrite any existing data. Again, the exact steps may vary depending on your operating system. On Windows, you can use Disk Management to initialize and format the RAID array. On Linux, you can use the mdadm command-line utility.
Step 6: Test the RAID array
Once the RAID array is initialized and formatted, it’s important to test its functionality to ensure that it is working properly. Copy some files to the RAID array and verify that they are being mirrored on both hard drives. You can also simulate a hard drive failure by disconnecting one of the drives to confirm that the data remains accessible.
Step 7: Monitor and maintain the RAID array
Now that RAID 1 is set up, it’s essential to regularly monitor the health and performance of the array. Many RAID configurations provide software tools or utilities to monitor the array’s status and send notifications in case of any issues. It’s also recommended to perform periodic data integrity checks and replace any failed hard drives promptly to maintain the redundancy of the RAID array.
Read Also: How to Make Friends in Pokemon Go and Level Up Your Buddy Training
In conclusion, setting up RAID 1 provides an extra layer of data protection by creating a mirrored copy of your data. This guide has outlined the step-by-step process for setting up RAID 1 on both Windows and Linux operating systems. By following these instructions and regularly maintaining the RAID array, you can ensure the safety and integrity of your valuable data.
In this step-by-step guide, we will walk you through the process of setting up RAID 1 for both Windows and Linux operating systems. RAID 1, also known as disk mirroring, duplicates data across two or more hard drives to ensure redundancy and data protection in case of a drive failure. This is an essential setup for users who prioritize data integrity and availability.
Before proceeding with the RAID setup, it is recommended to backup all your important data to an external storage device. This will ensure that your data is safe in case something goes wrong during the process.
To install the additional hard drive(s) required for RAID 1, you need to power off your computer completely. Unplug the power cord and take necessary precautions to prevent any electrical damage.
After installing the additional hard drive(s), plug in the power cord, and turn on your computer. Ensure that the operating system loads correctly and detects the newly installed hard drive(s).
sudo apt-get install mdadmsudo mdadm --create /dev/md0 --level=1 --raid-devices=2 /dev/sdb /dev/sdc (replace /dev/sdb and /dev/sdc with the appropriate device names).sudo mkfs.ext4 /dev/md0 (replace ext4 with the desired file system).To ensure that RAID 1 is functioning correctly, you can perform a test by copying some files to the RAID volume and then disconnecting one of the hard drives. Check if you can still access the files from the RAID volume. Repeat the test with the other hard drive to validate redundancy.
Read Also: RimWorld Review: An In-Depth Look at This Popular Sci-Fi Simulation Game
That’s it! You have successfully set up RAID 1 for both Windows and Linux operating systems. Your data will now be mirrored across multiple hard drives, providing redundancy and protection against drive failure.
RAID 1, also known as mirroring, is a popular method of data redundancy that provides increased data protection and fault tolerance. In a RAID 1 configuration, data is duplicated across multiple drives, creating an exact copy or mirror of each drive in the array.
This redundancy offers several advantages, including improved data availability and faster read speeds. In the event of a drive failure, the system can continue to operate without any loss of data, as the mirrored drive takes over the workload. Additionally, because data is read from multiple drives simultaneously, read performance can be significantly improved compared to a single drive configuration.
Setting up RAID 1 involves combining two or more drives into an array, where each drive contains an identical copy of the data. This can be done using both hardware and software methods, depending on the operating system and hardware configuration.
Some key features of RAID 1 include:
Overall, RAID 1 is a reliable and effective solution for data redundancy and improved performance, making it a popular choice for both personal and enterprise use.
In order to set up RAID 1 on both Windows and Linux operating systems, you will need the following:
By meeting these requirements, you will have the necessary hardware, software, and drivers to successfully set up and configure RAID 1 on your computer.
RAID 1 is a type of Redundant Array of Independent Disks that duplicates data across two or more drives. It is important because it provides data redundancy, meaning that if one drive fails, the data can still be accessed from the other drive.
To set up RAID 1 on Windows, you need at least two identical hard drives and a motherboard or RAID controller that supports RAID technology.
No, you cannot set up RAID 1 on an existing Windows installation without losing data. RAID 1 requires a fresh installation of the operating system.
To set up RAID 1 on Linux, you need to install the mdadm tool, configure the RAID array in the mdadm.conf file, create the RAID devices, and format them with a filesystem of your choice.
The advantages of using RAID 1 include data redundancy, improved read performance, and increased data availability. In the event of a drive failure, the system can continue running without interruption.
How To Get A Lot Of Gems In Clash Of Clans For Free? Are you tired of spending your hard-earned money on Clash of Clans gems? Well, we have good news …
Read Article
How To Get Gold Brawlers In Brawl Stars? In Brawl Stars, gold brawlers are some of the rarest and most powerful characters you can unlock. These …
Read Article
How To Get Shaders In Roblox? Roblox is a popular online game platform that allows users to create and play games created by other players. One of the …
Read Article
How To Create Smurf Account In Mobile Legends 2022? Mobile Legends is a popular mobile game that has gained a massive following since its release. …
Read Article
How Many Village In Coin Master? Coin Master is a popular mobile game that has taken the gaming world by storm. It combines elements of strategy, …
Read Article
Where Can I Find Agents In Genshin Impact? Agents are elusive and mysterious characters in Genshin Impact, often lurking in the shadows and holding …
Read Article


